Bitbucket Pipeline Cheatsheet
Table Of Contents
- Getting Started
- Build Images
- Variables
- Pipes
- Adding SSH Keys
- Adding SSH Host
- Using Encoded SSH Keys
- Runners
- References
Getting Started
Enable Pipelines
Before one can use Bitbucket pipelines, they must be enabled for the repository. To turn on pipelines, go to:
https://bitbucket.org/{organization}/{repo-slug}/admin/addon/admin/pipelines/settings
Pipeline File Location
Bitbucket expects the pipeline file to be called bitbucket-pipelines.yml and be located in the root of your repository.
touch $PROJECT_REPO_DIR/bitbucket-pipelines.yml
Example Pipeline
The following example pipeline will:
- Build your image and push to your Docker registry.
- Using a decoded base64 SSH Key:
- Copy the docker-compose file to the remote host
- Base64 decode and copy across the environment file.
- Execute the commands on the remote host to pull the latest built image.
- Deploy the image it just pulled, using the
docker-compose.ymlfile.
options:
  max-time: 10
  docker: true

definitions:
  steps:
    - step: &build
        name: build
        runs-on:
          - self.hosted
          - linux
        services:
          - docker
        script:
          - 'cd ${BITBUCKET_CLONE_DIR}'
          - 'export DOCKER_BUILDKIT=0'
          - 'docker login -u ${DOCKER_REGISTRY_USER} -p ${DOCKER_REGISTRY_PASSWORD} ${DOCKER_REGISTRY_HOST}:${DOCKER_REGISTRY_PORT}'
          - 'docker build --progress=plain --file="./docker/Dockerfile" -t ${DOCKER_REGISTRY_HOST}:${DOCKER_REGISTRY_PORT}/${DOCKER_IMAGE_NAME}:${BITBUCKET_BRANCH} .'
          - 'docker push ${DOCKER_REGISTRY_HOST}:${DOCKER_REGISTRY_PORT}/${DOCKER_IMAGE_NAME}:${BITBUCKET_BRANCH}'

    - step: &deploy
        name: deploy
        image: 'ubuntu:22.04'
        runs-on:
          - self.hosted
          - linux
        script:
          # Set the timezone and update packages, to prevent issues when installing packages.
          - 'TZ=Europe/London'
          - 'ln -snf /usr/share/zoneinfo/$TZ /etc/localtime && echo $TZ > /etc/timezone'
          - 'apt-get update -qq'

          # Configure SSH to allow us to SSH into the remote server.
          - 'which ssh-agent || ( apt-get install -qq openssh-client )'
          - 'eval $(ssh-agent -s)' # start the SSH agent. This must happen before any calls to ssh-add.
          - 'mkdir -p ~/.ssh'
          - 'echo -e "Host *\n\tStrictHostKeyChecking no\n\n" > ~/.ssh/config'
          - '(echo $SSH_KEY | base64 --decode > ~/.ssh/id_rsa)'
          - 'chmod 700 ~/.ssh/id_rsa'
          - 'ssh-add ~/.ssh/id_rsa'

          # Send over the docker-compose and environment files (after decoding where stored in variable).
          - 'scp -P ${SSH_PORT} ${BITBUCKET_CLONE_DIR}/docker-compose.yml ${SSH_USER}@${SSH_HOST}:~/docker-compose.yml'
          - '(echo $ENV_FILE | base64 --decode > ~/.env)'
          - 'scp -P ${SSH_PORT} ~/.env ${SSH_USER}@${SSH_HOST}:~/.env'

          # Send commands to remote server to pull latest image and deploy.
          - 'ssh -p ${SSH_PORT} ${SSH_USER}@${SSH_HOST} "docker login --username ${DOCKER_REGISTRY_USER} --password ${DOCKER_REGISTRY_PASSWORD} ${DOCKER_REGISTRY_HOST}:${DOCKER_REGISTRY_PORT}"'
          - 'ssh -p ${SSH_PORT} ${SSH_USER}@${SSH_HOST} "docker image prune -f"'
          - 'ssh -p ${SSH_PORT} ${SSH_USER}@${SSH_HOST} "docker-compose down"'
          - 'ssh -p ${SSH_PORT} ${SSH_USER}@${SSH_HOST} "docker pull ${DOCKER_REGISTRY_HOST}:${DOCKER_REGISTRY_PORT}/${DOCKER_IMAGE_NAME}:${BITBUCKET_BRANCH}"'
          - 'ssh -p ${SSH_PORT} ${SSH_USER}@${SSH_HOST} "docker tag ${DOCKER_REGISTRY_HOST}:${DOCKER_REGISTRY_PORT}/${DOCKER_IMAGE_NAME}:${BITBUCKET_BRANCH} ${DOCKER_IMAGE_NAME}:latest"'
          - 'ssh -p ${SSH_PORT} ${SSH_USER}@${SSH_HOST} "docker-compose up -d"'

  services:
    docker:
      memory: 3072

pipelines:
  branches:
    staging:
      - step: *build
      - step:
          <<: *deploy
          deployment: Staging
          trigger: manual

    production:
      - step: *build
      - step:
          <<: *deploy
          deployment: Production
          trigger: manual
Without Runner
The example above is configured to use my own private runner. If you would rather just use Bitbucket build minutes, then just remove this section:
        runs-on:
          - self.hosted
          - linux
Pipeline Validator
There is a validation tool available at https://bitbucket-pipelines.atlassian.io/validator so that you can check your pipeline before committing.
Build Images
All pipelines are executed through Docker containers. If one is not specified, then the default Atlassian pipeline image is used.
One can specify a different image through the image key like so:
pipelines:
  default:
    - branches
      - staging:
        - step:
          name: 'Build'
          image: docker:latest
          script:
            - cd ${BITBUCKET_CLONE_DIR}
            - docker login -u ${DOCKER_REGISTRY_USER} -p ${DOCKER_REGISTRY_PASSWORD} ${DOCKER_REGISTRY_HOST}:5000
            - export DOCKER_BUILDKIT=1
            - docker build --progress=plain -t ${DOCKER_REGISTRY_HOST}:5000/${DOCKER_IMAGE_NAME}:${BITBUCKET_BRANCH} .
            - docker push ${DOCKER_REGISTRY_HOST}:5000/${DOCKER_IMAGE_NAME}:${BITBUCKET_BRANCH}
        - step:
          image: ubuntu:20.04
          script:
            - echo "hello world"
If using the default Atlassian pipeline image (atlassian/default-image:3), this already has SSH installed.
Variables
Default Variables
Bitbucket provides a set of default variables to pipelines, which are available for builds, and can be used in scripts. I have organized them below in the order I think they are going to be most commonly useful. More information can be found in the official online docs.
BITBUCKET_CLONE_DIR
The absolute path of the directory that the repository is cloned into within the Docker container.
BITBUCKET_BRANCH
The source branch. This value is only available on branches. Not available for builds against tags, or custom pipelines.
BITBUCKET_BUILD_NUMBER
The unique identifier for a build. It increments with each build and can be used to create unique artifact names.
BITBUCKET_COMMIT
The commit hash of a commit that kicked off the build.
BITBUCKET_TAG
The tag of a commit that kicked off the build. This value is only available on tags. Not available for builds against branches.
BITBUCKET_EXIT_CODE
The exit code of a step, can be used in after-script sections. Values can be 0 (success) or 1 (failed).
BITBUCKET_WORKSPACE
The name of the workspace in which the repository lives.
BITBUCKET_REPO_UUID
The UUID of the repository.
BITBUCKET_REPO_SLUG
The URL-friendly version of a repository name. For more information, see What is a slug?.
BITBUCKET_REPO_FULL_NAME
The full name of the repository (everything that comes after http://bitbucket.org/).
BITBUCKET_PARALLEL_STEP
Zero-based index of the current step in the group, for example: 0, 1, 2, …
Not available outside a parallel step.
BITBUCKET_PARALLEL_STEP_COUNT
Total number of steps in the group, for example: 5.
Not available outside a parallel step.
BITBUCKET_PR_ID
The pull request ID.
Only available on a pull request triggered build.
BITBUCKET_PR_DESTINATION_BRANCH
The pull request destination branch (used in combination with BITBUCKET_BRANCH).
Only available on a pull request triggered build.
BITBUCKET_GIT_HTTP_ORIGIN
The URL for the origin, for example: http://bitbucket.org/{$ACCOUNT}/{$REPO}
BITBUCKET_GIT_SSH_ORIGIN
Your SSH origin, for example: git@bitbucket.org:/{$ACCOUNT}/{$REPO}.git
BITBUCKET_STEP_UUID
The UUID of the step.
BITBUCKET_PIPELINE_UUID
The UUID of the pipeline.
BITBUCKET_DEPLOYMENT_ENVIRONMENT
The URL friendly version of the environment name.
BITBUCKET_DEPLOYMENT_ENVIRONMENT_UUID
The UUID of the environment to access environments via the REST API.
BITBUCKET_PROJECT_KEY
The key of the project the current pipeline belongs to.
BITBUCKET_PROJECT_UUID
The UUID of the project the current pipeline belongs to.
BITBUCKET_STEP_TRIGGERER_UUID
The person who kicked off the build (by doing a push, merge etc), and for scheduled builds, the UUID of the pipelines user.
BITBUCKET_STEP_OIDC_TOKEN
The 'ID Token' generated by the Bitbucket OIDC provider that identifies the step. This token can be used to access resource servers, such as AWS and GCP without using credentials. Learn more.
BITBUCKET_BOOKMARK
For use with Mercurial projects.
CI
Default value is true. Gets set whenever a pipeline runs.
Workspace Variables
Variables specified for a workspace can be accessed from all repositories that belong to the workspace.
Repository Variables
Pipelines variables added at the repository level can be used by any user who has write access in the repository.
Deployment Variables
You can also define variables so that they can only be used in a specific deployment environment.
In this example, we use the deployment variable $DEPLOYMENT_VARIABLE which is specific to the Test deployment environment:
pipelines:
  default:
    - step:
        script:
          - "// do things here."
    - step:
        deployment: Test
        name: "Deploy to Test"
        script:
          - "echo $DEPLOYMENT_VARIABLE"
Major Issue - Cannot Reuse Deployment
When getting started with pipelines, I immediately hit an unforeseen issue.
One cannot specify the same deployment value across multiple steps.
E.g. I have a build and deploy step for both staging and production. This is because I use one Docker image that can build docker images to perform the build, and another to SSH into my remote host
and perform the pull and deploy commands.
Luckily, this issue has been raised with Atlassian, and apparently they are working on it, but the issue was raised in March 2019, and still has not been resolved, with 816 upvotes. Hopefully it will be dealt with soon as the issue is marked as in progress and someone is assigned to it.
In the meantime, the only safe solution, is to combine your multiple steps into a single step.
Secured Variables (Secrets)
You can secure a variable, which means it can be used in your scripts but its value will be hidden in the build logs (masked). Secure variables are stored as encrypted values.
In order to secure a variable, click the padlock to secure the variable.

Masking
As stated above, secured variables are hidden in the logs by replacing the value with the name of the variable.
E.g if one had a secured variable of $MY_HIDDEN_NUMBER with a value of 5, then all occurances of 5 in the logs
would get replaced with the text $MY_HIDDEN_NUMBER (not necessarily just where the variable was actually used).
Thus it is better to not secure common numbers/words, and only things like strong randomized passwords etc.
Luckily, the masking is clever enough to match against basic encodings of the variable value, such as URL encoding, to prevent them accidentally leaking out this way.
Pipes
When looking at Atlassians SFTP deploy example, one can see that they tell us to use a pipe like so:
- pipe: atlassian/sftp-deploy:0.5.11
  variables:
    USER: '<string>'
    SERVER: '<string>'
    REMOTE_PATH: '<string>'
    LOCAL_PATH: '<string>' # Optional.
    # SSH_KEY: '<string>' # Optional.
    # PASSWORD: '<string>' # Optional.
    # EXTRA_ARGS: '<string>' # Optional.
    # DEBUG: '<boolean>' # Optional.
A pipe is actually just a Docker image that gets run.
In this case we can see the code for this "pipe" (Docker image that get's run). In fact the Dockerfile is just an incredibly minimal/generic shell for executing a BASH script called pipe.sh.
FROM alpine:3.9

RUN apk --no-cache add \
    openssh=7.9_p1-r6 \
    sshpass=1.06-r0 \
    bash=4.4.19-r1 && \
    wget --no-verbose -P / https://bitbucket.org/bitbucketpipelines/bitbucket-pipes-toolkit-bash/raw/0.4.0/common.sh

COPY pipe.sh /
COPY LICENSE.txt README.md pipe.yml /

ENTRYPOINT ["/pipe.sh"]
The real logic is in this pipe.sh script, which performs the copying of the files to the remote host.
Adding SSH Keys
To add an SSH key, go into your Repository settings...
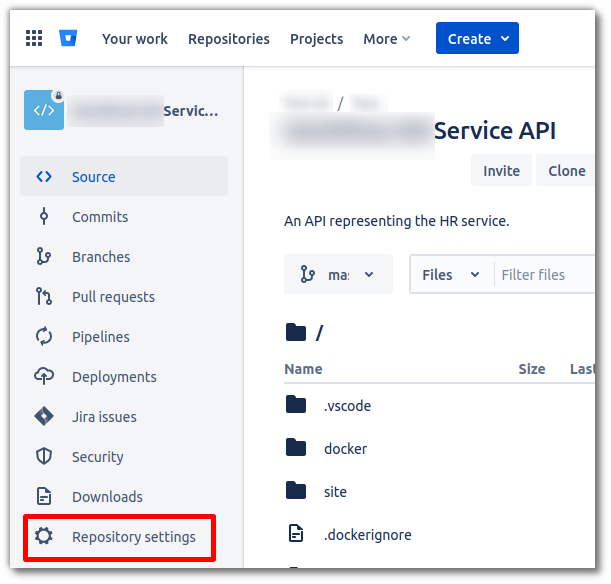
Then scroll down in the left-hand pane and select SSH keys (2).
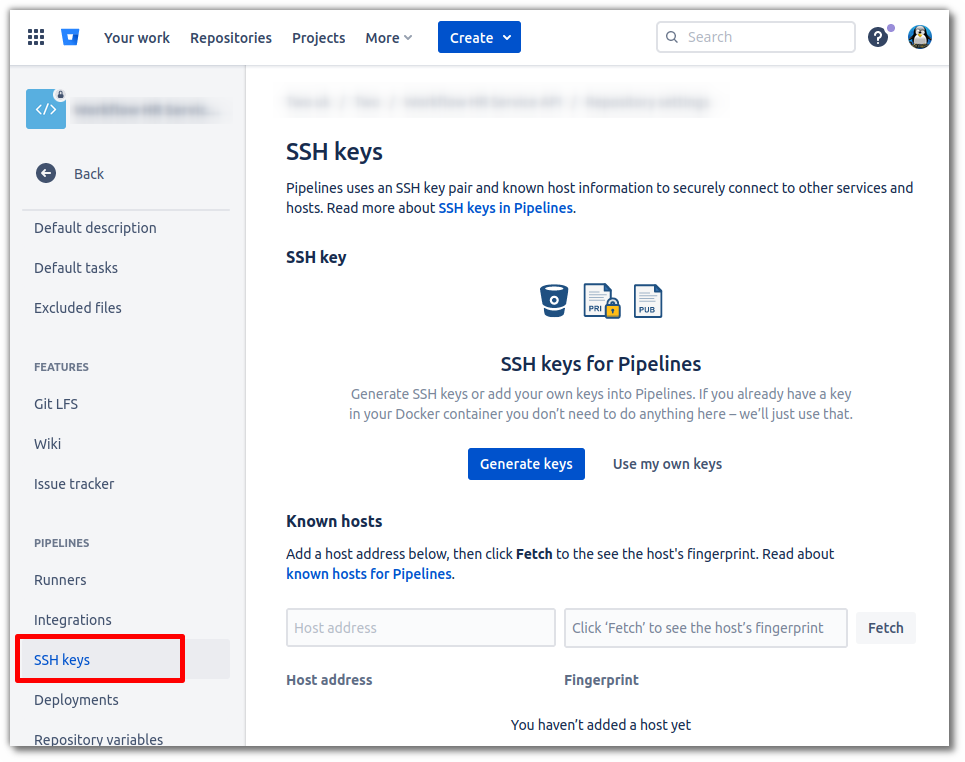
Alternatively, you can go the following URL (changing the variables):
https://bitbucket.org/{organization}/{repo-slug}/admin/addon/admin/pipelines/ssh-keys
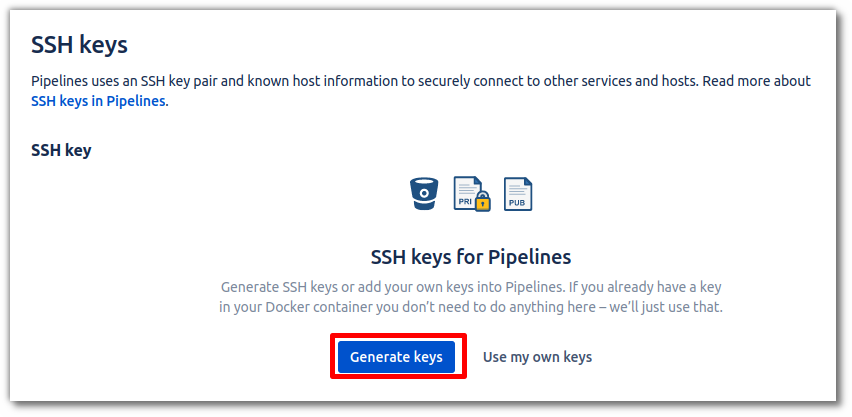
Using Bitbucket Generated Key
The easiest solution is to click on the button to have Bitbucket generate the key pair.
However, this will mean that you won't have access to the private key, unlike if you generate and use
your own key pair.
Then copy the public key that is provided to you:

...and append it to the $HOME/.ssh/authorized_keys file on your host.
Using Own Generated Keys
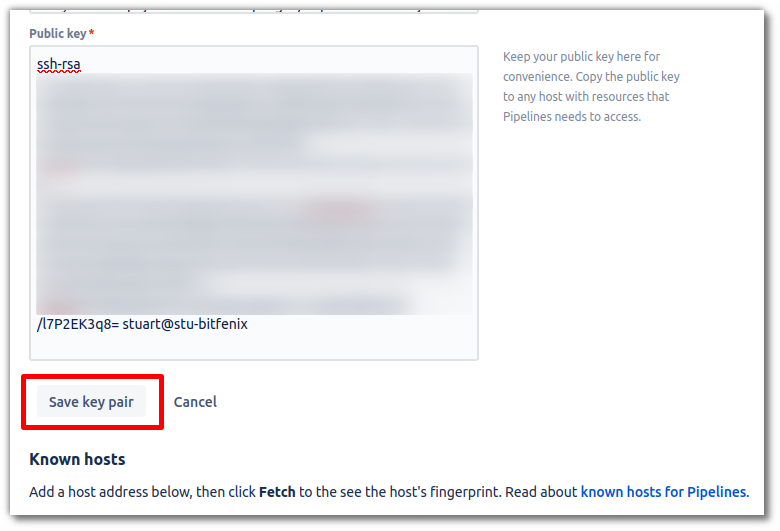
If you manually created your own keys, then click on Use my own keys.
Then paste your public/private keys in.
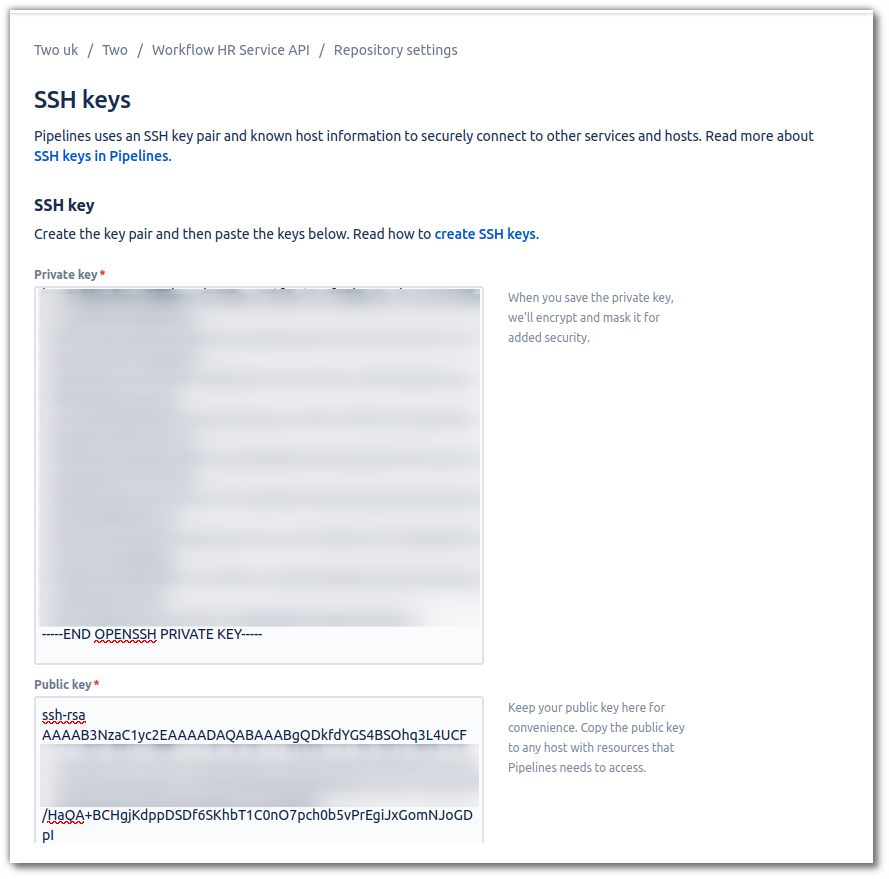
One has to scroll down to find the Save key pair button.
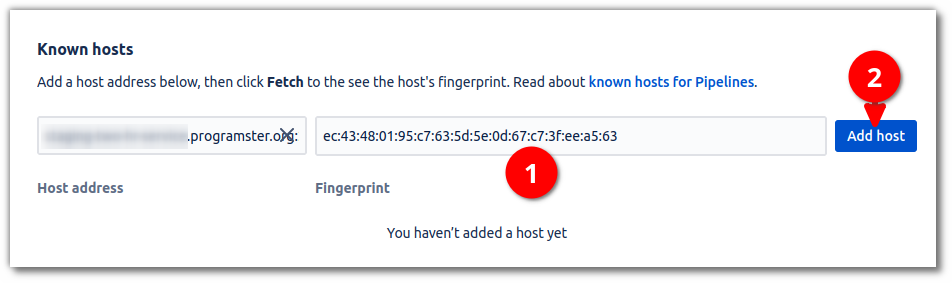
Add SSH Host
Bitbucket pipelines will only connect to hosts it is told about, so it is best to add the server we wish to connect to.
Go into your Repository settings.
Then scroll down in the left-hand pane and select SSH keys (2).
Alternatively, you can go the following URL (changing the variables):
https://bitbucket.org/{organization}/{repo-slug}/admin/addon/admin/pipelines/ssh-keys
Fill in the Host address field with the hostname/IP address of the host, and the port,
if the SSH port is something other than the default of 22.

Then hit fetch (2), an MD5-based fingerprint will appear in the fingerprint field (3).
Check Fingerprint
If you have terminal access to the host, you can check the fingerprint is correct by running:
ssh-keygen -l -E MD5 -f /etc/ssh/ssh_host_rsa_key.pub | awk '{print substr($0,10,47)}'
Alternatively, one can use the command above to get the value and put it in the field, rather than have Bitbucket fetch the fingerprint for you.
Using Encoded SSH Keys
This information relates to the official docs at Using Multiple SSH Keys.
- Create a PEM SSH key, and do not set a passphrse.
- Base64 encode the private key, because Bitbucket variables do not support line breaks.
base64 -w 0 < mySshKey
- In the Bitbucket repository, choose Repository settings, then Repository variables
- Copy and paste the base64-encoded private key from the terminal to a value for an environment variable.
- Set the environment variable as Secured.
Error If Using OpenSSH Key
If you create a normal OpenSSH key, instead of a PEM formatted key, then this will look like it succeeded, but when you come to use it in your pipeline, you will get the following error message:
Error loading key "/root/.ssh/id_rsa": error in libcrypto
This can be seen in the screenshot below:

Runners
Bitbucket Minutes
Bitbucket can process your pipelines for you, which eliminates the cost of acquiring, maintaining, and updating infrastructure and the staff required to look after them. It does this with a measurement of build minutes which you pay for. Build minutes are minutes executing a pipeline on a Bitbucket runner, excluding time spent acquiring the runner. They’re the minutes when your pipeline status is "In progress".
Each Bitbucket plan comes with a set number of monthly build minutes which you can see on the pricing page. The key thing is that one gets 50 free minutes per month, but if you are going to eat that up, you need to look into deploying your own runners, or paying for a standard or premium plan, which gives you a lot more minutes, but charges you per user.
Deploying Your Own Self-Hosted Runner
Runners allows you to run builds in Pipelines on your own infrastructure, and you won’t be charged for the build minutes used by your self-hosted runners.
You can deploy your own runners to save money! (and perhaps get better performance)
Repository and Workspace Runners
There two types of runners: repository, and workspace. Workspace runners will perform pipeline build across all repositories within the workspace, whilst repository runners will only perform builds of the repository they are assigned to.
Limits
- Docker Hub now imposes download rate limits which may affect you (since all builds run in Docker images).
- Authenticated users have a better image pull rate so it is recommend to login to your docker hub account on the docker host.
- Runners are subject to the same API rate-limits described in the API request limits document.
- The rate limit is 2000 requests/per minute per runner for artifacts / cache / log.
- You can configure and execute a maximum of 100 steps per pipeline.
- A maximum build time of 120 minutes per step. To reduce the total run time, we recommend using more parallel steps within your CI/CD workflow.
- You can configure up to 32GB (8x) of memory to run your builds (it's your own server memory).
Configuring Pipeline Step To Run On Specific Runner
References
- Bitbucket.org - Everything you need to know about build minutes in Bitbucket Pipelines
- Bitbucket Docs - Write a pipe for Bitbucket Pipelines
- Unix Tutorial - How To: Inspect SSH Key Fingerprints
- Superuser - What is a SSH key fingerprint and how is it generated?
- Stack Overflow - Calculate RSA key fingerprint
- Stack Overflow - Get SSH server key fingerprint
- community.atlassian.com - Use non-22 SSH port in pipelines?
- Bitbucket Docs - Runners
First published: 1st September 2022