Deploy RocketChat on Debian with Docker
System Requirements
- 1 GB RAM
Steps
Firstly, install docker and then install docker compose if you haven't already.
Install git
sudo apt-get install -y git
Clone the RocketChat repository and navigate to within the source code.
git clone https://github.com/RocketChat/Rocket.Chat.git
Clone the docker-compose file up to your home and remove all the other content (we dont actually wan the code and this simplifies the volumes later).
mv Rocket.Chat/docker-compose.yml $HOME/.
rm -rf Rocket.Chat
Now open the file in your editor. It should look similar to below (although it keeps changing).
version: '2'

services:
  rocketchat:
    image: rocketchat/rocket.chat:latest
    restart: unless-stopped
    volumes:
      - ./uploads:/app/uploads
    environment:
      - PORT=3000
      - ROOT_URL=http://localhost:3000
      - MONGO_URL=mongodb://mongo:27017/rocketchat
      - MONGO_OPLOG_URL=mongodb://mongo:27017/local
      - MAIL_URL=smtp://smtp.email
#       - HTTP_PROXY=http://proxy.domain.com
#       - HTTPS_PROXY=http://proxy.domain.com
    depends_on:
      - mongo
....
Go through it and change all instances of http://localhost:3000 to your server's IP or hostname.
Start rocket chat (both the mongo database container and the application container) by running the command below:
docker-compose up
Navigate to the server in your web browser.
https://[server ip or hostname]:3000
There is no default admin account at the time of writing this tutorial. Register yourself as the first user, which does not require email authentication and will default you to being an administrator.
The first time you register, you will be stuck on this screen for a looooong time.
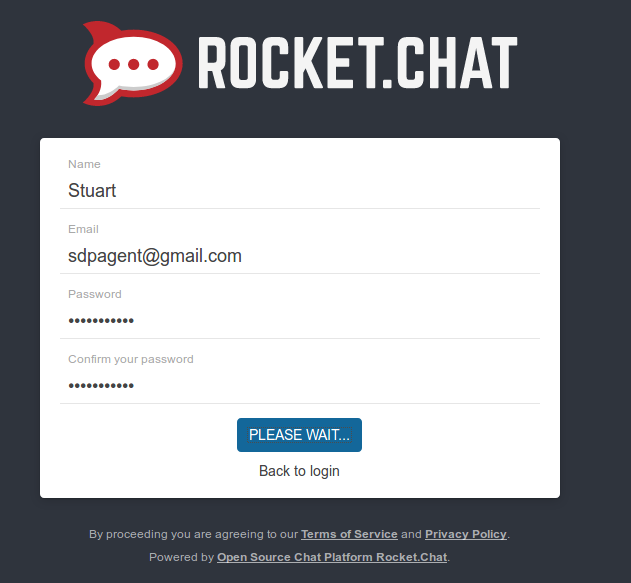
You may also see messages in the CLI from when you ran docker-compose with error messages from hubot_1. Just ignore these and wait.
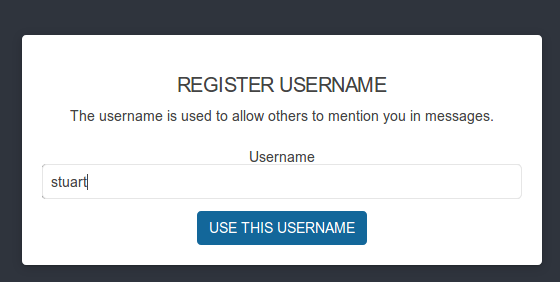
If you wait patiently enough, eventually you will see this screen and you're good to go.
One of the first things you may need to do is look through the settings and configure SMTP and email confirmation for registration.
A Note About State
After having run the docker-compose up command, rocket chat will create the following folders from wherever you ran the command (which should be in $HOME if you used my instructions).
- data
- scripts
- uploads
The folders are volumes for your containers and hold the state so that your server will persist across reboots/containers.
Issues
At this point, the only way to enable SSL is to configure a reverse proxy that points to this container. I will provide better instructions for how to do this, at a later date.
Install Client
Once you have installed the server. You may wish to install the client rather than connecting through your web browser.
Update 22nd Oct 2021
I came back to this after not having used Rocket Chat in quite some time and hit an issue when re-deploying. I tweaked the docker-compose file as shown in this pull request which resolved my issues. The result is below:
version: '2'

services:
  rocketchat:
    image: registry.rocket.chat/rocketchat/rocket.chat:latest
    command: >
      bash -c
        "for i in `seq 1 30`; do
          node main.js &&
          s=$$? && break || s=$$?;
          echo \"Tried $$i times. Waiting 5 secs...\";
          sleep 5;
        done; (exit $$s)"
    restart: unless-stopped
    volumes:
      - ./uploads:/app/uploads
    environment:
      - PORT=80
      - ROOT_URL=https://rocketchat.mydomain.com
      - MONGO_URL=mongodb://mongo:27017/rocketchat
      - MONGO_OPLOG_URL=mongodb://mongo:27017/local
      - MAIL_URL=smtp://smtp.gmail.com
      - HTTP_PROXY=https://rocketchat.mydomain.com
      - HTTPS_PROXY=https://rocketchat.mydomain.com
    depends_on:
      - mongo
    ports:
      - 80:80
    labels:
      - "traefik.backend=rocketchat"
      - "traefik.frontend.rule=Host: rocketchat.mydomain.com"

  mongo:
    image: mongo:4.2
    restart: unless-stopped
    volumes:
     - ./data/db:/data/db
     #- ./data/dump:/dump
    command: mongod --oplogSize 128 --replSet rs0 --storageEngine=wiredTiger
    labels:
      - "traefik.enable=false"

  # this container's job is just run the command to initialize the replica set.
  # it will run the command and remove himself (it will not stay running)
  mongo-init-replica:
    image: mongo:4.2
    command: >
      bash -c
        "for i in `seq 1 30`; do
          mongo mongo/rocketchat --eval \"
            rs.initiate({
              _id: 'rs0',
              members: [ { _id: 0, host: 'localhost:27017' } ]})\" &&
          s=$$? && break || s=$$?;
          echo \"Tried $$i times. Waiting 5 secs...\";
          sleep 5;
        done; (exit $$s)"
    depends_on:
      - mongo

  # hubot, the popular chatbot (add the bot user first and change the password before starting this image)
  hubot:
    image: rocketchat/hubot-rocketchat:latest
    restart: unless-stopped
    environment:
      - ROCKETCHAT_URL=rocketchat:3000
      - ROCKETCHAT_ROOM=GENERAL
      - ROCKETCHAT_USER=bot
      - ROCKETCHAT_PASSWORD=botpassword
      - BOT_NAME=bot
  # you can add more scripts as you'd like here, they need to be installable by npm
      - EXTERNAL_SCRIPTS=hubot-help,hubot-seen,hubot-links,hubot-diagnostics
    depends_on:
      - rocketchat
    labels:
      - "traefik.enable=false"
    volumes:
      - ./scripts:/home/hubot/scripts
  # this is used to expose the hubot port for notifications on the host on port 3001, e.g. for hubot-jenkins-notifier
    ports:
      - 3001:8080
Websocket Issue
When I tried to sign in on the app, I got an error message stating that the server did not support websockets. I managed to resolve this by changing my nginx reverse proxy to have the following configuration:
server {
    listen 80;
    server_name rocketchat.mydomain.com;
    return 302 https://rocketchat.mydomain.com$request_uri;
}

server {
    listen 443 ssl;

    ssl on;

    server_name rocketchat.mydomain.com;

    access_log  /var/log/nginx/access.log;

    ssl_certificate      ssl/rocketchat.mydomain.com/site.crt;
    ssl_certificate_key  ssl/rocketchat.mydomain.com/private.pem;

    ssl_protocols        SSLv3 TLSv1 TLSv1.1 TLSv1.2;
    ssl_ciphers RC4:HIGH:!aNULL:!MD5;
    ssl_prefer_server_ciphers on;
    keepalive_timeout    60;
    ssl_session_cache    shared:SSL:10m;
    ssl_session_timeout  10m;

    proxy_set_header Connection '';
    proxy_http_version 1.1;
    chunked_transfer_encoding off;
    proxy_buffering off;
    proxy_cache off;

    location / {
        proxy_pass      http://192.168.0.11/;
        proxy_http_version 1.1;
        proxy_set_header Upgrade $http_upgrade;
        proxy_set_header Connection "upgrade";
        proxy_set_header Host $http_host;
        proxy_set_header X-Real-IP $remote_addr;
        proxy_set_header X-Forwarded-For $proxy_add_x_forwarded_for;
        proxy_set_header X-Forwarded-Proto https;
        proxy_set_header X-Nginx-Proxy true;
        proxy_redirect off;
    }
}
References
First published: 16th August 2018