Deploy WireGuard Server With Web UI Through Docker
- Introduction
- Steps
- Creating A Client
- Using Wireguard on Ubuntu
- Using Wireguard On Windows / Mac / Android / iOS
Introduction
This tutorial will show you how to quickly deploy your own WG Easy wireguard server, which I found to be the easiest and fastest way to deploy a VPN server, which even worked behind my dedicated server's NAT (after having configured port forwarding).
If you wish to deploy a Wireguard server from scratch (e.g. not using Docker and without a nice web UI, then I would suggest you go to my other tutorial: Deploy WireGuard VPN Server on Debian 12 and/or watch Christian Lempa's video on Wireguard Installation and configuration instead.
Prerequisites
- Docker and Docker Compose
Related Posts
Steps
When specifying it in the .env file later, one will need to make sure to wrap the generated hash in single quotes ('), in order for it to pass through correctly.
Create The Docker Compose File
Log into your server and create the following docker-compose.yml file wherever you wish to "install" this.
services:

  wg-easy:
    image: ghcr.io/wg-easy/wg-easy:${WG_VERSION}
    container_name: wg-easy
    ports:
      - "51820:51820/udp"
      # disabled public HTTP port 51821 as accessing this
      # internally through Caddy proxy (TLS connection)
      #- "51821:51821/tcp"
    restart: unless-stopped
    cap_add:
      - NET_ADMIN
      - SYS_MODULE
    sysctls:
      - net.ipv4.ip_forward=1
      - net.ipv4.conf.all.src_valid_mark=1
      - net.ipv6.conf.all.disable_ipv6=0
      - net.ipv6.conf.all.forwarding=1
      - net.ipv6.conf.default.forwarding=1
    volumes:
      - wireguard:/etc/wireguard
 #   uncomment this if you wish to disable ipv6
 #   environment:
 #     - DISABLE_IPV6=true

  caddy:
    container_name: caddy
    image: caddy:2.10.0-alpine
    # publish everything you deem necessary
    ports:
      - '80:80/tcp'
      - '443:443/tcp'
      - '443:443/udp'
    restart: unless-stopped
    volumes:
      - './Caddyfile:/etc/caddy/Caddyfile:ro'
      - caddy_config:/config
      - caddy_data:/data

volumes:
  wireguard:
  caddy_config:
  caddy_data:
Alternatively, if you do not need to use Caddy as a reverse proxy, because you have some alternative reverse proxying system in place, then you can just use this:
services:

  wg-easy:
    image: ghcr.io/wg-easy/wg-easy:${WG_VERSION}
    container_name: wg-easy
    ports:
      - "51820:51820/udp"
      - "51821:51821/tcp"
    restart: unless-stopped
    cap_add:
      - NET_ADMIN
      - SYS_MODULE
    sysctls:
      - net.ipv4.ip_forward=1
      - net.ipv4.conf.all.src_valid_mark=1
      - net.ipv6.conf.all.disable_ipv6=0
      - net.ipv6.conf.all.forwarding=1
      - net.ipv6.conf.default.forwarding=1
    volumes:
      - wireguard:/etc/wireguard

volumes:
  wireguard:
Create The Environment File
Now create a file called .env with the following content, in the same directory as the docker-compose.yml file you just created.
Be sure to update the values as appropriate to you.
# Specify the version of WG Easy to use. Check out
# https://github.com/wg-easy/wg-easy/pkgs/container/wg-easy/versions
# or use the value "latest"
WG_VERSION="15"
Create the Caddyfile
If you are using the standalone Caddy version, then you need to create the Caddyfile configuration file.
editor Caddyfile
Fill it with the following (editing as appropriate).
{
        # setup your email address
        email my.email@gmail.com
}

wireguard.mydomain.com {
    reverse_proxy wg-easy:51821
}
my.email@gmail.com with your email address, and
wireguard.mydomain.com with your servers FQDN (DNS must have already been set up and accessible from internet on port 80/443).
Extra - Full List Of Possible Configuration Options
In case you are interested, the full list of possible environment variables
can be found on the GitHub page.
If you make use of any additional environment variables, be sure to add them to the docker-compose.yml file as appropriate. E.g. just adding them to the .env file won't work
on its own.
A common setting that you may wish to set is the WG_DEFAULT_DNS which you may wish to change to an internal DNS server that you deployed, or
8.8.8.8, 8.8.4.4 if you would prefer to use Google DNS instead of the default, which is Cloudflare's on 1.1.1.1.
You may also wish to add UI_TRAFFIC_STATS with a value of true, in order to turn on traffic stats which default to being off.
Deploy
Run the following command to start the Wireguard server now that we have created the docker-compose.yml and .env files.
docker-compose up -d
Optional - Nginx Configuration
If you are not using the Caddy version, and need the Nginx reverse proxy configuration, then below is an example. Tweak it as you need, making sure to update the FQDN and your wireguard servers internal IP address.
server {
    listen 80;
    server_name wireguard.mydomain.com;
    return 302 https://wireguard.mydomain.com$request_uri;
}

server {
    listen 443 ssl;

    server_name wireguard.programster.org;

    access_log  /var/log/nginx/access.log;

    ssl_certificate      ssl/wireguard.mydomain.com/site.crt;
    ssl_certificate_key  ssl/wireguard.mydomain.com/private.pem;

    ssl_protocols        TLSv1.3;
    ssl_ciphers RC4:HIGH:!aNULL:!MD5;
    ssl_prefer_server_ciphers on;
    keepalive_timeout    60;
    ssl_session_cache    shared:SSL:10m;
    ssl_session_timeout  10m;

    location / {
        proxy_pass      http://w.x.y.z:51821/;
        include         /etc/nginx/proxy.conf;
    }
}
Alternatively, you may be interested in using something simpler like Nginx Proxy Manager.
Optional - Change The UDP Port
Unfortuantely, I have a TURN server deployed on that IP whose UDP port range is 49152 - 65535, for which the default wireguard UDP Port of 51820 is right in the middle of.
Thus I opted to change the Wireguard server to operate on port 40000 instead. This was as easy as adding WG_PORT=40000 to the enviornment variables, and remapping the
UDP port to be listening on the host on port 40000. The WG_PORT tells the website to generate the
client configurations such that it tells the client to connect on that port, and we did the port remapping at the Docker level. Below is the updated docker-compose.yml file:
services:

  wg-easy:
    image: ghcr.io/wg-easy/wg-easy:${WG_VERSION}
    container_name: wg-easy
    ports:
      - "40000:40000/udp"
      - "51821:51821/tcp"
    restart: unless-stopped
    cap_add:
      - NET_ADMIN
      - SYS_MODULE
    sysctls:
      - net.ipv4.ip_forward=1
      - net.ipv4.conf.all.src_valid_mark=1
    volumes:
      - ./volumes/wireguard:/etc/wireguard
    environment:
      - WG_HOST
      - PASSWORD
      - WG_PORT=40000
:4000 on the end of the Endpoint value (assuming you also used port 4000).
Creating A Client
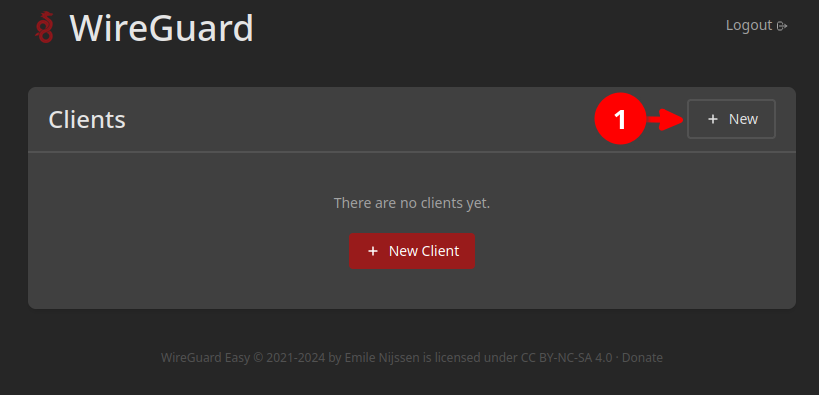
Now that we have deployed our Wireguard server, we need to create a client connection, and download the configuration file in order to use it. Each client will have a fixed IP on this network, meaning that client's can communicate with each other as well.
https://wireguard.mydomain.com
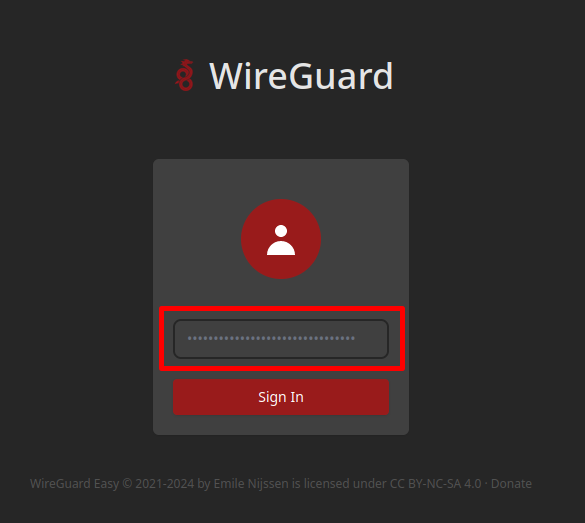
Create the administrator account, and finish the initial web installation.
Click on the New button in the top-right corner in order to create a new client connection configuration.
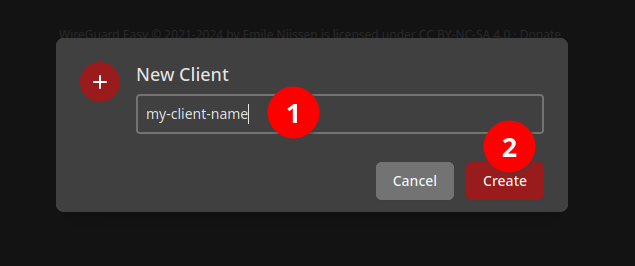
Give it a name to remember it by.
Download it's configuration by clicking on this icon.
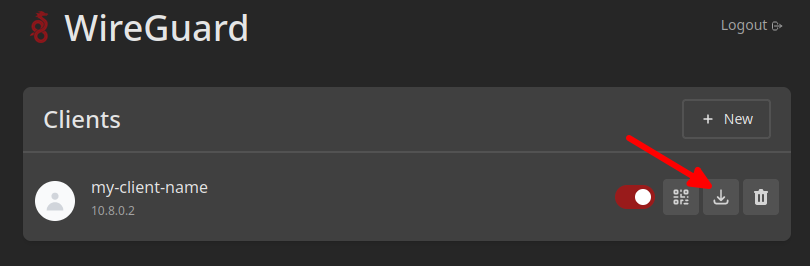
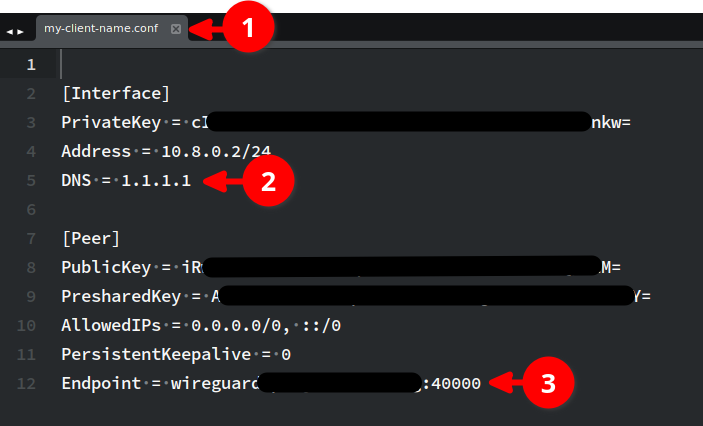
The client configuration file will be named after the name you gave the client connection (1).
If you didn't change the DNS through the environment variables, you may wish to just manaully change it here (2).
A value of 1.1.1.1 is for Cloudflare's DNS.
The server's FQDN or IP address should show up as the Endpoint (3). Here I have port 4000 because I manually changed
the server configuration to not clash with my TURN server's UDP port range.
Using Wireguard
Install Required Packages
In order to use Wireguard on Ubuntu, you need to install wireguard and the openresolv packages.
sudo apt update \
  && sudo apt install -y wireguard openresolv
You need to install the openresolv otherwise later you will get:
/usr/bin/wg-quick: line 32: resolvconf: command not found
Move Configuration File Into Place
Move the downloaded configuration file to /etc/wireguard/$NAME_FOR_CONNECTION.conf and make sure
that the permissions are set to 700 (that file contains your key/secret).
Connect
wg-quick up $NAME_FOR_CONNECTION
If you're used to using OpenVPN, you may find it unusual that the output just stops. Nothing went wrong and you are still connected.
Alternatively, if you don't wish to rely on sticking the configuration file in the expected location, you can simply specify the absolute path to the configuration file like so:
wg-quick up /home/username/vpns/my-wireguard-config.conf
Disconnect
To disconnect, run:
wg-quick down $NAME_FOR_CONNECTION
... or if you used an absolute path to a config file:
wg-quick down /home/username/vpns/my-wireguard-config.conf
Get Status
If you wish to get the status of the wireguard connections (such as seeing if any are up, and how much traffic has flowed through them), you can run:
sudo wg show
DNS
I found that the wg-quick was only setting my DNS from the config file, by changing my /etc/resolv.conf file.
99% of the time this is fine, but I found that when I ran docker-compose commands afterwards, my DNS was getting
reset to how it was before (thus I was not using the DNS server of my Wireguard connection).
The personal workaround I found for this was to run some additional commands after having connected to the VPN,
in order to configure the systemd resolver to use the IP address of the now connected internal DNS server.
These commands achieve this by creating a relevant config file within /etc/systemd/resolved.conf.d/,
and restarting the resolver:
sudo echo "[Resolve]" | sudo tee /etc/systemd/resolved.conf.d/wireguard.conf
sudo echo "DNS=xxx.xxx.xxx.xxx" | sudo tee -a /etc/systemd/resolved.conf.d/wireguard.conf
sudo echo "Domains=~." | sudo tee -a /etc/systemd/resolved.conf.d/wireguard.conf
sudo echo "" | sudo tee -a /etc/systemd/resolved.conf.d/wireguard.conf

sudo systemctl daemon-reload
sudo systemctl restart systemd-resolved
This meant that if systemd were to change the /etc/resolv.conf file back to using the local stub
resolver, the stub resolver was then set to use the DNS server within my wireguard connected network.
Howevever, bear in mind that I cannot do this before connecting to the VPN, as that would cause
DNS to stop working (trying to use a server that it can't reach), and my VPN configuration is set
to use a hostname for the connection endpoint, as I had to set up dynamic DNS to connect to my
constantly changing home IP address.
When disconnecting from the VPN, one would need to run the following commands to remove the config file we added, and restart the systemd resolver for the changes to take effect:
sudo rm /etc/systemd/resolved.conf.d/wireguard.conf
sudo systemctl daemon-reload
sudo systemctl restart systemd-resolved
BASH Script
I prefer to run my VPN connection in a tmux/byobu session, and leave it running, knowing that I can press ctrl-c to close it when I am done. This also helps prevent me from forgetting that I have a VPN connection open, since it is tying up one of my first tmux session in byobu. To do this, I have a start-vpn command that runs the following BASH lines:
#!/bin/bash
wg-quick up /path/to/vpns/connection-name/client.conf

# configure systemd to use the wireguard connected DNS server.
sudo echo "[Resolve]" | sudo tee /etc/systemd/resolved.conf.d/wireguard.conf
sudo echo "DNS=xxx.xxx.xxx.xxx" | sudo tee -a /etc/systemd/resolved.conf.d/wireguard.conf
sudo echo "Domains=~." | sudo tee -a /etc/systemd/resolved.conf.d/wireguard.conf
sudo echo "" | sudo tee -a /etc/systemd/resolved.conf.d/wireguard.conf

sudo systemctl daemon-reload
sudo systemctl restart systemd-resolved

# Tie up the console with stats about the connection, until I press ctrl-c
watch -n 1 sudo wg show

# We get here after pressing ctrl-c, shutdown the VPN connection.
wg-quick down /path/to/vpns/connection-name/client.conf

# change DNS back to how it used to be.
sudo rm /etc/systemd/resolved.conf.d/wireguard.conf
sudo systemctl daemon-reload
sudo systemctl restart systemd-resolved
By doing this, the watch -n 1 sudo wg show line "ties up" the tmux session, outputting the connection statistics,
until I am ready to quit by pressing ctrl-c. It will then quit out of the watch command and finish by running
the command to shut the connection down, which is exactly what I want.
Using Wireguard On Windows / Mac / Android / iOS
You can download a client from the Wireguard website.
Appendix
Create A Password Hash
In older versions, one needed to create and pass a password hash. This is what I used to do and is here for reference.
WG Easy has switched to using bcrypt hashed passwords rather than having the password as plain text in the environment variables.
To create a strong random password and generate its bcrypt form, I found the easiest solution to be this PHP script I created and ran in the terminal:
<?php

$randomPassword = base64_encode(random_bytes(32));
print "Random password is: " . PHP_EOL;
print $randomPassword . PHP_EOL . PHP_EOL;

$hash = password_hash($randomPassword, PASSWORD_BCRYPT);
print "Bcrypt hash is: "  . PHP_EOL;
print $hash . PHP_EOL;
References
- Simplifying VPN Setup - An Introduction to WireGuard Easy for Self-Hosted VPNs
- GItHub - WG Easy
- Reddit - Wireguard: connection between clients?
- SuperUser - Wireguard selective routing
- Level1Techs Forum - Wg-quick and DNS
First published: 30th April 2024