KVM Cheatsheet
Table of Contents
- Related Posts
- Guest Management
- Guest Querying
- Snapshotting
- Networking
- CPU Management
- Resizing Memory
- Misc
- References
Related Posts
Guest Management
List Guests
virsh list --all
Running Only
If you only want to list the runnning virtual machines then use:
virsh list
Names Only
If you just want to list the names of the guests (probably to pipe through some subsequent process/script), then you can do this:
sudo virsh list --all | awk '{print $2}' | head -n -1 | tail +3
Change Guest State (Shutdown/Reboot etc){#state-management}
Shutdown Guest
virsh shutdown $VM_ID_OR_NAME
Start Guest
virsh start $VM_ID_OR_NAME
Reboot Guest
virsh reboot $VM_ID_OR_NAME
Destroy a Guest
This command is an ungraceful shutdown, much like if you were to pull the power out of a computer. You should use this if a guest becomes unresponsive. It does not delete the guest. The disk image will remain and the guest can be restarted.
virsh destroy $VM_ID_OR_NAME
Suspend Guest
Run the following command to suspend a guest:
virsh suspend $VM_ID_OR_NAME
Suspension is a way to immediately "pause" a guest so that it no longer uses the CPU, disk, or network. However, it will continue to reside in memory. You may want to save/load a session instead, which would mean it no longer takes up memory, but is not instant. such that it no longer takes up memory and can be restored to its exact state (even after a reboot), it is necessary to save and restore the guest.
Resume Guest
To resume a guest (unsuspend them), run the following command:
virsh resume $VM_ID_OR_NAME
Save Guest
virsh save $VM_ID $FILENAME
Saves the RAM (not including disk) of a running guest to a "state file" at the specified file name/path, so that it can be restored later.
Once saved, the domain will no longer be running on the system, thus the memory allocated for the domain will be free for other domains to use. virsh restore (in "Load Guest" below) restores from this state file.
Optional parameters
- --xml $FILEPATH - Usually omitted, but can be used to supply an alternative XML file for use on the restored guest with changes only in the host-specific portions of the domain XML . For example, it can be used to account for file naming differences that are planned to be made via disk snapshots of underlying storage after the guest is saved.
If you forgot to provide this, you can make use of
save-image-definelater to achieve the same effect. You may also wish to refer tosave-image-dumpxmlandsave-image-edit - --bypass-cache - the save will avoid the file system cache, although this may slow down the operation.
- --running | --paused - Normally, restoring a saved image will decide between running or paused based on the state the domain was in when the save was done; passing either the --running or --paused flag will allow overriding which state the restore should use.
- --verbose
Progress may be monitored using domjobinfo virsh command and canceled with domjobabort (or just Ctrl-C).
Load Guest (restore)
virsh restore $FILENAME
Clone Guest
Below is a simple example of cloning a guest.
virt-clone \
  --original $VM_TO_CLONE \
  --auto-clone \
  --name $NEW_VM_NAME
Guest Preparation With Virt-sysprep
When you clone a guest, you have everything the guest has. We quite often don't want that and actually just want to create a new guest from a template. In such scenarios you probably want to remove the log files and reset the SSH host keys (identity) etc.
I do this by running the following after the virt-clone command above:
sudo virt-sysprep \
  --domain $NEW_VM_NAME \
  --operations machine-id,dhcp-client-state,bash-history,logfiles,customize,ssh-hostkeys \
  --firstboot-command 'dpkg-reconfigure openssh-server && service ssh restart'
- If you don't have the
virt-sysprepcommand, then you can get it by installing thelibguestfs-toolspackage. - The
customizeoperation is required for the--firstboot-commandto work. - You can find the full list of possible operations by running
virt-sysprep --list-operations - If you don't specify
--operations, then all operations run, which you may not want. E.g. I do not want to wipe the authorized SSH keys.
Migrate Guest
Please refer to my blogpost: KVM - Offline Migration.
Rename guest
virsh domrename $OLD_NAME $NEW_NAME
Define a Guest
Defining a guest allows one to start it from its name, rather than having to find it's XML file and
running virsh create $name.xml. This means that guests will also show in virsh list --all when
they are shutdown.
virsh define filename.xml
Undefine a Guest
In order to use a name over again for a new guest, you have to undefine the old one. You need to remove it's storage system as well.
virsh undefine $VM_ID
Edit Guest Configuration
You can manually edit the guest's xml configuration file with:
virsh edit $VM_ID
Autostart Management
Start Guest on Boot (Autostart)
virsh autostart $VM_ID
Disable Guest Start On Boot
To disable Guest Autostart
virsh autostart --disable $VM_ID
Console
Enter Guest's Console
virsh console $VM_ID
Exit Guest's Console
Use the following keyboard shortcut (not a command):
Cntrl-]
Guest Querying
This section is all about retrieving information about a guest.
List Guest Block (Disk) Devices
sudo virsh domblklist $GUEST_DOMAIN
Example output:
 Target   Source
-----------------------------------------------------------------
 vda      /home/stuart/kvm/zfs1.programster.org/root-disk.qcow2
 vdb      /home/stuart/kvm/zfs1.programster.org/data-disk.qcow2
Show Block Devices Across All Guests
Since I dont want to manually loop through all of the guests to try and find which one a qcow2 file belongs to, once can run the following command to get the block devices of all of one's guests, and find it from there:
sudo virsh list --all | awk '{print $2}' | head -n -1 | tail +3 | \
  xargs -d $'\n' sh -c 'for arg do echo "\n $arg"; virsh domblklist "$arg"; done'
Example output:
 zabbix-nginx-test
 Target   Source
---------------------------------------------------------------------------------
 vda      /home/stuart/kvm/templates/template-debian-12/zabbix-nginx-test.qcow2


 zfs1.programster.org
 Target   Source
-----------------------------------------------------------------
 vda      /home/stuart/kvm/zfs1.programster.org/root-disk.qcow2
 vdb      /home/stuart/kvm/zfs1.programster.org/data-disk.qcow2


 zfs2.programster.org
 Target   Source
-----------------------------------------------------------------
 vda      /home/stuart/kvm/zfs2.programster.org/root-disk.qcow2
 vdb      /home/stuart/kvm/zfs2.programster.org/data-disk.qcow2
Get Guest Block Device Statistics
If you wish to get details about a specific block device for a guest, you can run:
sudo virsh domblkinfo $GUEST_ID $BLOCK_IDENTIFIER
E.g.
sudo virsh domblkinfo dhcp.programster.org vda
Example output:
Capacity:       16106127360
Allocation:     10163277824
Physical:       10163519488
Show Running Guest Memory Statistics
sudo virsh dommemstat $GUEST_DOMAIN
Example output:
actual 786432
swap_in 0
swap_out 0
major_fault 280
minor_fault 35165
unused 606568
available 725152
usable 582352
last_update 1697559991
disk_caches 44256
rss 760452
List Guest Network Interfaces
sudo virsh domiflist $GUEST_ID
Get Guest MAC Address
Run the following command if you wish to retrieve a guest's MAC address:
sudo virsh domiflist $GUEST_ID | sed -n 3p | awk '{print $5}'
Get Guest State
If you need to determine what state a guest is in, you can run:
virsh domstate $GUEST_ID
This helps with running scripts. E.g. If you wish to make sure the guest has been shut down before running an rsync, you can use:
STATE=$(virsh domstate $GUEST_ID)

if [[ "$STATE" =~ "shut off" ]]; then
    # rsync ...
else
    echo "Cannot backup server that is currently running!"
fi
The most useful outputs of domstate are:
runningshut off
Snapshotting
Create Internal Snapshot
virsh snapshot-create $VM_ID
Create Internal Snapshot With Name
virsh snapshot-create-as $VM_ID $SNAPSHOT_NAME
Create Internal Snapshot With Name and Description
virsh snapshot-create-as $VM_ID $SNAPSHOT_NAME $DESCRIPTION
Create Internal Snapshot With Name and Description Using File
If you just love writing xml, then you can create a file like so:
<domainsnapshot>
    <name>Name for the snapshot</name>
    <description>Description for the snapshot</description>
</domainsnapshot>
... then pass it to virsh snapshot-create to create the snapshot
virsh snapshot-create $VM_ID $FILEPATH
Create External Snapshot
List Snapshots
virsh snapshot-list $VM_ID
--tree or --leaves parameters.
Restore Snapshot
virsh snapshot-revert $VM_ID $SNAPSHOT_NAME
Delete Snapshot
virsh snapshot-delete $VM_ID $SNAPSHOT_NAME
Edit Snapshot
If you use virsh with internal qcow2 snapshots and you decide to move the file to another location, you will not be able to restore those snapshots. This is easily fixed by editing the snapshots and updating the filepath.
virsh snapshot-edit $VM_ID_OR_NAME $NAME_OF_SNAPSHOT
Blockcommit
Use blockcommit to merge a qcow2 file down into its backing file.
Blockpull
- Use blockpull to flatten a disk/image chain by moving data up the chain.
- The principal here is to "flatten" a chain, so it is impossible to target the removal of a single node in the chain except if your chain happens to be small enough.
- The original files will be kept unless you provide the
--deleteoption.- Be careful about providing
--deleteas you might have other guests using disk images that reference them if you use thin-provisioning.
- Be careful about providing
- Full list of options can be found here.
This example will pull all the images up into the current active/head image, for disk vda.
virsh blockpull $GUEST_ID vda --wait
--waitcauses the command to block until the operation completes.
The following example will flatten a chain by merging all images above the specified base, so that the base will be referenced by the current top/active disk image.
E.g. your chain will only contain the active, the base, and any images the base references.
virsh blockpull \
  $GUEST_ID \
  vda \
  --base /path/to/disk-image.qcow2 \
  --verbose \
  --wait
Networking
List Default Network DHCP Leases
If you deployed a virtual machine using the default network, which is configured as a NAT with DHCP, then you may wish to run the following command to get it's leases:
sudo virsh net-dhcp-leases default
This will output something like:
 Expiry Time           MAC address         Protocol   IP address           Hostname   Client ID or DUID
------------------------------------------------------------------------------------------------------------------------------------------------
 2024-04-04 13:31:40   52:54:00:11:c2:32   ipv4       192.168.122.101/24   -          ff:56:50:4d:98:00:02:00:00:ab:11:97:9c:02:87:e7:5a:35:8a
 2024-04-04 13:11:15   52:54:00:84:6a:a9   ipv4       192.168.122.94/24    -          ff:56:50:4d:98:00:02:00:00:ab:11:17:93:03:93:3e:0c:47:b5
 2024-04-04 13:20:46   52:54:00:f4:e3:4f   ipv4       192.168.122.123/24   -          ff:56:50:4d:98:00:02:00:00:ab:11:22:ac:ae:37:07:af:02:50
The most recent lease to be handed out will be at the top, so if you just deployed a new VM on this network, that is likely to be it's IP.
List All Network Configs
virsh net-list --all
/home/stuart/network-configs/
Running Only
virsh net-list
Edit Network Config
virsh net-list $NETWORK_NAME
Create Temporary Network Config
virsh net-create --file $ABSOLUTE_FILE_PATH
Create Permanent Network Config
virsh net-define --file $ABSOLUTE_FILE_PATH
Example Bridge Network Config File
<network>
  <name>examplebridge</name>
  <forward mode='route'/>
  <bridge name='kvmbr0' stp='on' delay='0'/>
  <ip address='192.168.1.1' netmask='255.255.255.0' />
</network>
Start Network Config
virsh net-start $NETWORK_ID
Enable Network Autostart
net-autostart --network $NETWORK_ID
Disable Network Autostart
net-autostart \
  --network $NETWORK_ID \
  --disable
Example Manual Network Config With Bridge
This is an example /etc/network/interfaces file for Ubuntu users.
bridge-utils package beforehand.
# The loopback network interface
auto lo
iface lo inet loopback

# The primary network interface
auto p17p1
iface p17p1 inet manual

auto kvmbr0
iface kvmbr0 inet static
    address 192.168.1.19
    netmask 255.255.255.0
    network 192.168.1.0
    broadcast 192.168.1.255
    gateway 192.168.1.254
    bridge_ports p17p1
    bridge_stp off
    bridge_fd 0
    bridge_maxwait 0
Netplan Version
Here is a netplan version:
# This file describes the network interfaces available on your system
# For more information, see netplan(5).
network:
  version: 2
  renderer: networkd
  ethernets:
    enp39s0:
      dhcp4: no
  bridges:
    kvmbr0:
      addresses: [ 192.168.1.186/24 ]
      gateway4: 192.168.1.1
      nameservers:
        addresses:
          - 8.8.8.8
          - 8.8.4.4
      interfaces:
        - enp39s0
Example Netplan DHCP Config
The following config will set up a bridge where your host is using DHCP.
network:
  version: 2
  renderer: networkd
  ethernets:
    enp3s0:
      dhcp4: no
      dhcp6: no
  bridges:
    kvmbr0:
      dhcp4: yes
      dhcp6: no
      nameservers:
        addresses:
          - 8.8.8.8
          - 8.8.4.4
      interfaces:
        - enp3s0
Configure VM To Use Manual Bridge
If you manually set the bridge up with the section above rather than through using the virsh net commands, this is how to configure deployed guests make use of it:
virsh edit $VM_ID
Find the following section
    <interface type='network'>
      <mac address='52:54:00:4d:3a:bd'/>
      <source network=''/>
      <model type='virtio'/>
      <address type='pci' domain='0x0000' bus='0x00' slot='0x02' function='0x0'/>
    </interface>
Change it to be like so:
    <interface type='bridge'>
        <mac address='52:54:00:4d:3a:bd'/>
        <source bridge='[bridge name here]'/>
        <model type='virtio'/>
        <address type='pci' domain='0x0000' bus='0x00' slot='0x02' function='0x0'/>
    </interface>
Now run the following two commands since reboots wont work.
virsh shutdown $VM_ID
virsh start $VM_ID
Add Network Interface to VM
I used the command below to add a NIC to my guest that uses my host's bridge interface called kvmbr1.
virsh attach-interface \
  --domain guest1 \
  --type bridge \
  --source kvmbr1 \
  --model virtio \
  --config
--live parameter.
--mac but without it, one will be generated randomly.
Resizing Memory
Run the following command to bring up the config for the guest.
virsh edit $VM_ID
Change the memory and currentMemory fields to be the size you want in KiB.
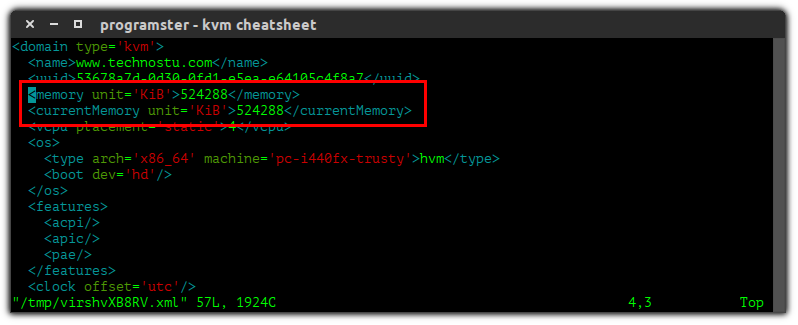
Now use virsh to shutdown and startup the container for the changes to take effect.
Resizing Memory With Script
VM_ID="my_vm_id"
NEW_AMOUNT="4000"

EDITOR='sed -i "s;[0-9]*</currentMemory>;$NEW_AMOUNT</currentMemory>;"' virsh edit $VM_ID
EDITOR='sed -i "s;[0-9]*</memory>;$NEW_AMOUNT</memory>;"' virsh edit $VM_ID

virsh shutdown $VM_ID
virsh start $VM_ID
virsh memtune. See here for more details.
CPU Management
Discover CPU Scheduling Parameters
virsh schedinfo $VM_ID
Permanently Set CPU Shares For Live Running Guest
virsh schedinfo $VM_ID \
  --set cpu_shares=[0-262144] \
  --live \
  --current \
  --config
Get the CPU Pinning Settings for a Guest
virsh vcpupin blog.programster.org
Example output:
VCPU: CPU Affinity
----------------------------------
   0: 0-3
   1: 0-3
I got the output above because I gave the guest access to 2 vCPUs but didn't pin anything.
Pin A CPU
If I wanted to set the cores that a guest can use, I could do the following:
virsh vcpupin blog.programster.org 0 2
That will set the first vCPU (the one with ID 0) to only run on core ID 2. Thus the output of
virsh vcpupin blog.programster.org changes to:
VCPU: CPU Affinity
----------------------------------
   0: 2
   1: 0-3
Misc
List OS Variants
When creating a guest with virt-install you need to specify the --os-variant. To get a list of
acceptable values (on Ubuntu 16.04), install the libosinfo-bin package before running the command
below:
osinfo-query os
Disable AppArmor
If you are trying to use external snapshots, you may find it easier to disable apparmor. Do this by editing your qemu configuration:
sudo vim /etc/libvirt/qemu.conf
... and adding the following line for the security_driver
security_driver = "none"
Then restart libvirt for the changes to take effect.
sudo service libvirtd restart
Share Clipboard
To share a clipboard between your host and guest, you just need to install the spice-vdagent package in the guest.
sudo apt install spice-vdagent
KVM XML Config File Location
If your server dies, and you need to somehow retrieve the XML configurations for your virtual
machines from the disk drives, it's good to know that you can find them in the folder at:
/etc/libvirt/qemu.
References
- Managing KVM on RHEL 6 using the virsh Command-line Tool
- Red Hat Docs - Chapter 20. Managing guests with virsh
- Libvirt Docs - net-create
- Libvirt Docs - net-define
- Ubuntu Docs - KVM/Managing
- virt-clone(1) - Linux man page
- IBM - Working with libvirt cgroups
- Libvirt - memtune
- Using CGroups with libvirt and LXC/KVM guests in Fedora 12
- KVM - Changing Memory of Guests Live
- Stack Overflow - Changing the dhcp IP range in Virbr0's XML file using virsh in bash script
- Nixcraft - KVM: Start a Virtual Machine / Guest At Boot Time
- Nixcraft - How to rename KVM virtual machine (VM) domain with virsh command
- Redhat Docs - 8.3 LIBVIRT NUMA TUNING
- Unix & Linux - libvirt: error : unable to set AppArmor profile
- Unix & Linux - How to configure AppArmor so that KVM can start guest that has a backing file chain
- Red Hat Docs - 20.13. Working with Snapshots
- Ask Ubuntu - How can I copy&paste from the host to a KVM guest?
- cyberciti.biz - How to reset a KVM clone virtual Machines with virt-sysprep on Linux
First published: 16th August 2018