OpenVPN + (DigitalOcean) IP Alias
Digital Ocean introduced floating IP addresses a while ago and combined with yesterday's announcement that the UK is now going to record all of our traffic "for one year", I thought it was about time to re-deploy my VPNs with this new feature and outside of the UK. This means:
- People visiting xxx.programster.org will not be recorded. All the UK government will be able to see is that there is a connection between my servers and my VPN.
- If one of my VPN's "dies" I will be able to deploy another with the same floating IP resulting in me not having to reconfigure my firewalls which use an IP whitelist to allow access.
- The government should not be able to track my personal internet habits. I don't want them to know that secretly, deep down, I am a massive nerd.
In an earlier post, I discussed how to set up OpenVPN on Debian 8. Below is how to alter that configuration to use a floating IP that you've assigned it. If you do not perform these steps, then your VPN will be working with the instance's fixed IP instead.
Steps
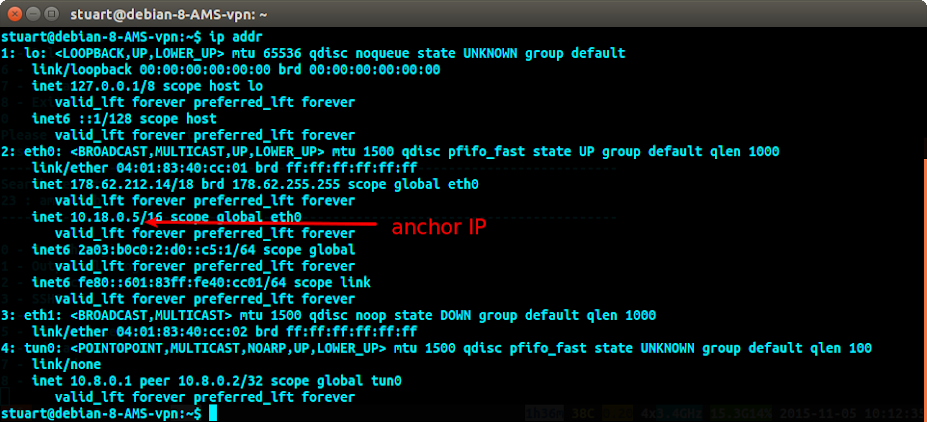
Use the ip addr command to find your "anchor IP". Unfortunately, this address will not show up in the output of ifconfig. Hopefully yours will be similar to mine and start with 10.x.x.x.
Once you have the anchor IP. Find the line near the top of your /etc/openvpn/server.conf file:
;local a.b.c.d
... and replace it with
local [anchor IP]
Then edit the /etc/rc.local script that my tutorial automatically created/edited and replace the like with MASQUERADE with:
iptables -t nat -A POSTROUTING -s 10.8.0.0/24 -j SNAT --to-source [anchor IP]
For example, my full script looks like:
#!/bin/sh -e
#
# rc.local
#
# This script is executed at the end of each multiuser runlevel.
# Make sure that the script will "exit 0" on success or any other
# value on error.
#
# In order to enable or disable this script just change the execution
# bits.
#
# By default this script does nothing.

iptables -A FORWARD -m state --state RELATED,ESTABLISHED -j ACCEPT
iptables -A FORWARD -s 10.8.0.0/24 -j ACCEPT
iptables -A FORWARD -j REJECT
#iptables -t nat -A POSTROUTING -s 10.8.0.0/24 -o eth0 -j MASQUERADE
iptables -t nat -A POSTROUTING -s 10.8.0.0/24 -j SNAT --to-source 10.18.0.5
exit 0
Now reboot the server.
On your local machine (or any other device that intends to use the VPN) edit local client.conf file and update the
remote xxx.xxx.xxx.xxx
line with
remote [floating IP address (not anchor)]
That's it! Now you will appear to other services/sites as if you are coming from the floating IP address rather than the fixed one that every instance is deployed with.
First published: 16th August 2018