Configuring The Proxmox Firewall
Proxmox comes with its own in-built firewall which is pretty neat. However, it is important to make sure to test it is behaving as you expect, because it is easy to get caught out by the multiple levels which are:
- the Datacenter,
- Nodes
- Virtual machines
The firewall needs to be enabled at all of the levels above where you are configuring, in order to have an effect. E.g. if you want to configure the firewall at the virtual machine level, then you need it enabled at the Datacenter, and the node on which the virtual machine is running.
My manual installation of Proxmox on Debian 12 (e.g. not using the ISO), did not have the firewall enabled at the top Datacenter level, so no firewall rules at any level would apply. You probably want to enable this after the installation so that you don't forget.
Enabling The Firewall
One has to remember to enable the firewall at each level.
To enable the firewall at the top (Datacenter) level:
1) Click on Datacenter. 2) Scroll down the middle pane to find Firewall and expand it. 3) Click on Options 4) Double click anywhere on the first row to bring up a modal with a checkbox to turn on/off the firewall.
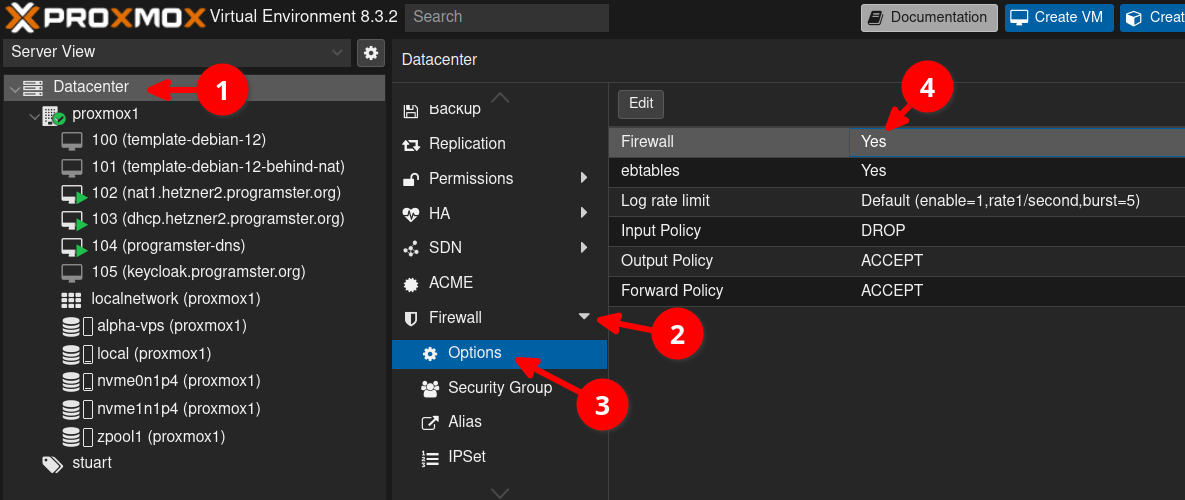
Policies Are Managed Here
You will also notice that your policies are set here, with the default for Input being to DROP, so make sure you have some rules in place to let you through, so you don't get locked out!

To enable the firewall at the node and virtual machine level, it is the same flow, except you change the first step to clicking on the node or virtual machine first.
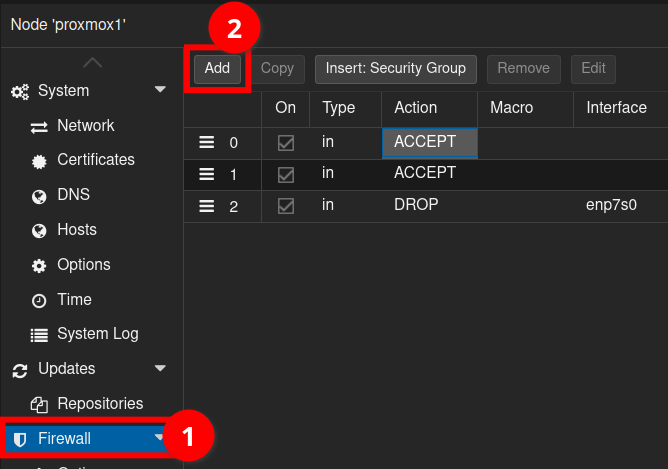
Adding Rules
Adding rules are as easy as Clicking the Add button and filling in the modal as appropriate to whatever you wish to configure.
The key thing to remember is that rules are evaluated from top to bottom, so you probably want your ACCEPT rules at the top, before placing your REJECT all rules at the bottom.
eno1, but after a network reconfiguration and a reboot, it might need to be vmbr0 instead.
Testing
To test that the firewall changes took effect, I ran an nmap scan against port 111 which is used by services such as rpcbind and is open/usable by default. You can check this by running the following command:
nmap -p 111 $PROXMOX_IP
If your firewall has not been configured at all, then it will respond with the following output:
Starting Nmap 7.80 ( https://nmap.org ) at 2025-01-15 18:40 GMT
Nmap scan report for static.xxx-xxx-xxx-xxx.clients.your-server.de (xxx.xxx.xxx.xxxx)
Host is up (0.024s latency).

PORT    STATE SERVICE
111/tcp open  rpcbind

Nmap done: 1 IP address (1 host up) scanned in 0.09 seconds
When your firewall is in place, then you should see something like so:
Starting Nmap 7.80 ( https://nmap.org ) at 2025-01-15 18:50 GMT
Note: Host seems down. If it is really up, but blocking our ping probes, try -Pn
Nmap done: 1 IP address (0 hosts up) scanned in 3.02 seconds
This one is important to block, because apparently it is abused for DDoS reflection attacks against third parties.
Disabling The Firewall From The CLI
If something goes horribly wrong, but you are able to gain CLI access (either physical, or through an attached KVM), then you can disable the firewall by running the followign command:
sudo pve-firewall stop
That will stop the firewall temporarily, but it will still show as enabled in the Web UI. When you have fixed your firewall rules, be sure to restart it with:
sudo pve-firewall start
First published: 15th January 2025