Debian 12 - Manually Install Rundeck
Introduction
This tutorial will show you how to manually install Rundeck on Debian 12, rather than deploying through Docker. Normally, I would only use Docker for deployments, but I have been frustrated by Rundeck 5 no longer working with Terraform [1][2], so have switched back to a manual installation where I can update the configuration files to resolve the issue and they don't revert back.
Install Steps
System Requirements
The first thing you need to do is deploy a server with at least the following specs:
- 2 vCPU
- More than 4 GB RAM (4GB for the Rundeck JVM alone, then there is the database on top).
- 20 GB disk
Setup Database
Before we get to actually deploying Rundeck, we need to deploy a database for it to be configured to use later. This is because according to the docs, the database system Rundeck comes with (H2) is not considered safe for production because it not resilient if Rundeck is not shutdown gracefully.
If you already have a remote database configured, then skip to installing Rundeck. However, for those that wish to quickly get set up with everything being contained on this one Debian 12 server, then the easiest way is to install docker and then use it to deploy a local PostgreSQL database that can only be connected to from the host.
Create Installation Area
First lets create an area to setup PostgreSQL within.
mkdir $HOME/postgresql
Create Secret Password File
Now we need to create a file that will contain the password for the PostgreSQL database. This is the safest/easiest way to set a strong random password with the ability to set special characeters without issues
touch $HOME/postgresql/.password
chmod 700 $HOME/postgresql/.password
editor $HOME/postgresql/.password
Put in a strong random password for the database to be configured with.
Create Docker Compose File
editor $HOME/postgresql/docker-compose.yaml
services:
  db:
    image: postgres:17.2-bookworm
    container_name: db
    restart: always
    ports:
      - "127.0.0.1:5432:5432"
    volumes:
      - db-data:/var/lib/postgresql/data
    secrets:
      - db_password
    environment:
      - POSTGRES_USER=rundeck
      - POSTGRES_DB=rundeck
      - POSTGRES_PASSWORD_FILE=/run/secrets/db_password

secrets:
  db_password:
    file: ${HOME}/postgresql/.password

volumes:
  db-data:
    driver: local
127.0.0.1 ensures that the container is bound to only the local IP, and the container cannot be accessed
from outside the host for security. If you do wish to be able to connect to the database externally, then you can just remove the
127.0.0.1: part.
Install Rundeck
Run the following BASH script on Debian 12 to install Rundeck.
#!/bin/bash

# Install required packages
sudo apt update && sudo apt install curl gnupg2 -y

# Add the gpg key so we trust their signed packages.
curl -L https://packages.rundeck.com/pagerduty/rundeck/gpgkey | sudo apt-key add -

# Add their repo to our sources
KEY_URL="https://packages.rundeck.com/pagerduty/rundeck/gpgkey"  \
  && curl -fsSL $KEY_URL | sudo gpg --dearmor -o /usr/share/keyrings/rundeck.gpg

sudo echo "deb [arch=amd64 signed-by=/usr/share/keyrings/rundeck.gpg] https://packages.rundeck.com/pagerduty/rundeck/any/ any main
deb-src [arch=amd64 signed-by=/usr/share/keyrings/rundeck.gpg] https://packages.rundeck.com/pagerduty/rundeck/any/ any main" \
  | sudo tee /etc/apt/sources.list.d/rundeck.list

# Install rundeck from the packages
sudo apt update \
  && sudo apt install rundeck -y
Post Installation Steps
Configure Rundeck To Use PostgreSQL
sudo editor /etc/rundeck/rundeck-config.properties
Find the line that has dataSource.url....
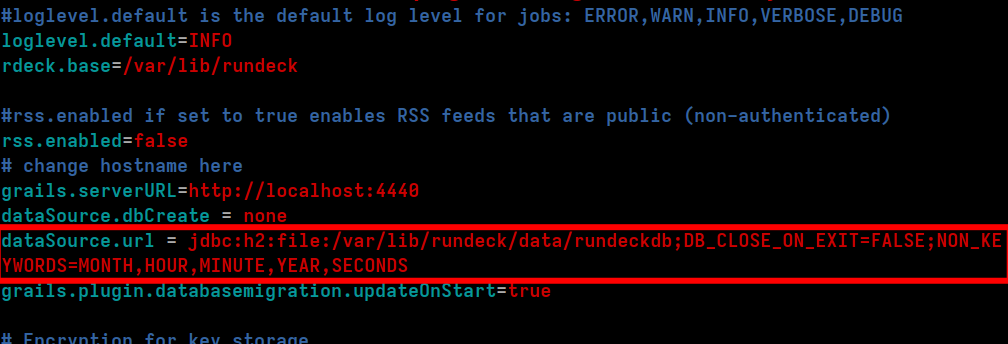
...and replace it with the following lines:
dataSource.driverClassName = org.postgresql.Driver
dataSource.url = jdbc:postgresql://127.0.0.1/rundeck
dataSource.username = rundeck
dataSource.password = myRundeckPasswordHere
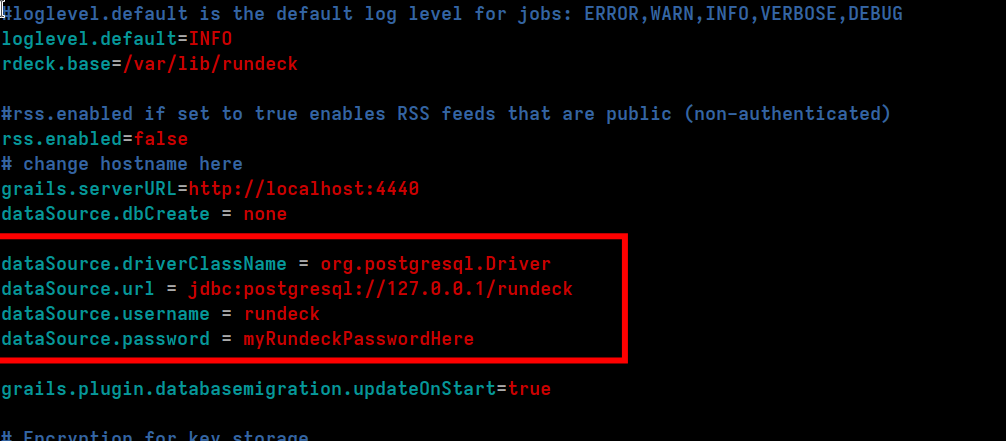
myRundeckPasswordHere with whatever the password you created earlier was.
Configuring Admin Password
The admin password is a known weak password, so the first thing you need to do is set a stronger one.
Open the realm.properties file where users are set:
sudo editor /etc/rundeck/realm.properties
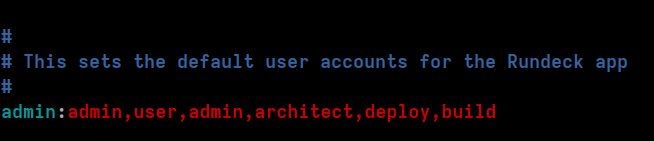
Find the line with:
admin:admin,user,admin,architect,deploy,build
We need to update this with our stronger password, and it is best if we store a strongly hashed form of the password in this file, rather than having it in plaintext. The easiest way that I found to do this was with this custom PHP script I created that generates the line for me.
Create and run the following PHP script to generate the line to replace the admin line with:
<?php
# Fill in these settings as appropriate
$PASSWORD='';
$USERNAME="admin";
$ROLES = [
'user',
'admin',
'architect',
'deploy',
'build'
];
$output=password_hash($PASSWORD, PASSWORD_BCRYPT);
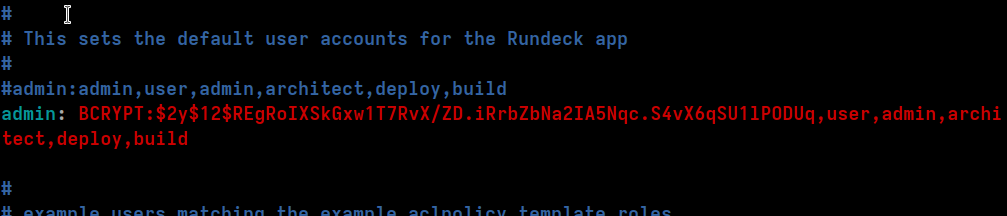
print "{$USERNAME}: BCRYPT:{$output}," . implode(",", $ROLES) . PHP_EOL;
Then overwrite the original line, or comment it out and put it just below like so:
If you want to add additional users, simply repeat these steps and add them as additional lines (making sure to change the username and roles).
Configure Reverse Proxy
It is best to set up an encrypted connection to the Rundeck server, and the easiest way to do this is to create a reverse proxy that handles and terminates the HTTPS connection before passing on the request to the Rundeck server over the secure internal network (could even be the same host).
Please refer here for how to do this with Nginx.
Change Expected URL
We logged in earlier by going to localhost. However if this is not the actual FQDN that you access Rundeck on,
then all of the redirections (such as when you login), won't work. We need to tell Rundeck what FQDN it
should be using. E.g. https://rundeck.mydomain.com if you have set it up behind a reverse proxy.
sudo editor /etc/rundeck/rundeck-config.properties
Find the line that has grails.serverURL= and change it's value as appropriate.
E.g. something like:
grails.serverURL=https://rundeck.mydomain.com

Manually Start Rundeck
sudo systemctl daemon-reload
sudo service rundeckd start
Run the following command to check the log output from Rundeck:
tail -f /var/log/rundeck/service.log
A while after having started Rundeck (it takes a minute or two before the output really gets going),you should see the following:
Grails application running at http://localhost:4440 in environment: production
Start Rundeck On Boot
Run the following command to configure Rundeck to start on boot in future so you don't have to manually start it each time.
sudo systemctl enable rundeckd
Service Status Command
To check the status of the service, you need to run:
sudo service rundeckd status
rundeckd instead of just rundeck.
Optional - Checking PostgreSQL Setup
If you wish to manually check/confirm that Rundeck is actually using your PostgreSQL database, you could install some packages to be able to log into the database and check it.
sudo apt update \
  && sudo apt install -y postgresql-common postgresql-client-15
Then login with:
DB_NAME="rundeck"
DB_USER="rundeck"
sudo -u $DB_USER psql -h 127.0.0.1 $DB_NAME
... and enter the password you set earlier.
Then you can run the following command to list all the tables that Rundeck created:
\dt
You should see the following output:
                  List of relations
 Schema |           Name            | Type  |  Owner
--------+---------------------------+-------+---------
 public | auth_token                | table | rundeck
 public | base_report               | table | rundeck
 public | databasechangelog         | table | rundeck
 public | databasechangeloglock     | table | rundeck
 public | execution                 | table | rundeck
 public | job_file_record           | table | rundeck
 public | log_file_storage_request  | table | rundeck
 public | notification              | table | rundeck
 public | orchestrator              | table | rundeck
 public | plugin_meta               | table | rundeck
 public | project                   | table | rundeck
 public | rdoption                  | table | rundeck
 public | rduser                    | table | rundeck
 public | referenced_execution      | table | rundeck
 public | scheduled_execution       | table | rundeck
 public | scheduled_execution_stats | table | rundeck
 public | storage                   | table | rundeck
 public | stored_event              | table | rundeck
 public | webhook                   | table | rundeck
 public | workflow                  | table | rundeck
 public | workflow_step             | table | rundeck
 public | workflow_workflow_step    | table | rundeck
(22 rows)
Type the following to quit out:
\q
First Login
You should now be able to log in at http://localhost:4440 (or the URL of your reverse proxy) with
the username and password you set earlier.
If you skipped that step, the the username and password will both be set to admin.
Optional - Switch API To Legacy XML For Terraform/Tofu
Run the following command to switch the API to using XML, in order to have the Terraform provider work.
sudo echo "
# Switch to legacy XML for Terraform to work
rundeck.feature.legacyXml.enabled=true" \
  | sudo tee -a /etc/rundeck/rundeck-config.properties
Conclusion
You have now deployed and configured your Rundeck server manually. Be sure to check my other Rundeck tutorials for additional things you may be interested in.
References
First published: 20th January 2025