Deploy Stubby Server For DNS Over TLS (DoT)
Introduction
The Problem
I would like to use DNS over TLS in order to encrypt my DNS queries so that my ISP (or anyone else outside my network) can't see them.
I don't want to have to individually configure each of the machines inside my network to setup DNS over TLS. Instead, I want a "normal" DNS server inside my network perform the DoT work, and just have all my network machines set to use that server for normal DNS queries.
The Solution
This tutorial will show you how to install Stubby to act as a DNS stub server in your network, to take DNS requests and send them to an upstream resolver with DNS over TLS. Thus, the machines in your network can use this server as a traditional DNS server, and unencrypted DNS requests no longer leave your home network.
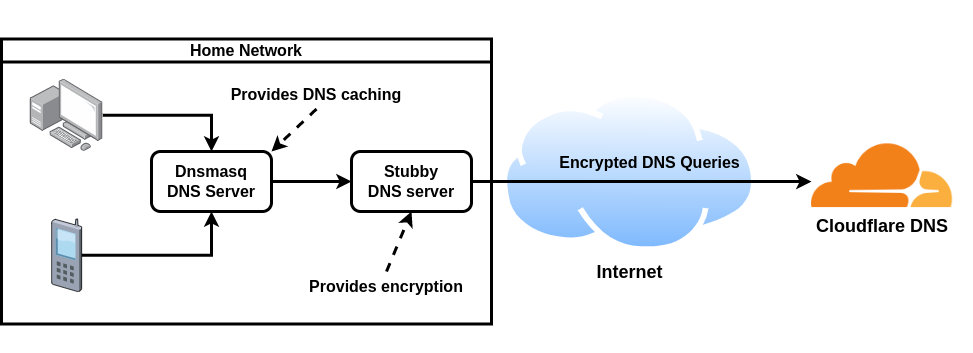
It's even better if you deploy your own dnsmasq server to act as a stub resolver on your network, and configure it to use stubby for its upstream DNS. That way you can benefit from the DNS caching that dnsmasq provides. Below is a diagram to help explain:
Steps
Deploy Debian 12 Server
Deploy a Debian 12 server inside your network. However you do this is up to you. E.g. a VPS inside Proxmox or a pure KVM server etc.
Install Stubby
Install stubby by running:
sudo apt update && sudo apt install stubby -y
Backup The Config
Now we need to configure Stubby to use our prefferred DNS over TLS provider. In this case we are going to use Cloudflare. To do this, first lets create a backup of the default configuration:
sudo cp /etc/stubby/stubby.yml /etc/stubby/stubby.yml.bak
Listen For External Requests
By default, the server will only listen to requests coming from the server itself. This means that it will listen
for DNS requests coming from other machines on your network. To change this, we simply need to add 0.0.0.0 to the
list of addresses to listen on. Find this section:
################################ LISTEN ADDRESS ################################
# Set the listen addresses for the stubby DAEMON. This specifies localhost IPv4
# and IPv6. It will listen on port 53 by default. Use <IP_address>@<port> to
# specify a different port
listen_addresses:
  - 127.0.0.1
  - 0::1
... and change it to:
################################ LISTEN ADDRESS ################################
# Set the listen addresses for the stubby DAEMON. This specifies localhost IPv4
# and IPv6. It will listen on port 53 by default. Use <IP_address>@<port> to
# specify a different port
listen_addresses:
  - 0.0.0.0
  - 127.0.0.1
  - 0::1
Enable Preferred Resolvers
Find this part:
## Cloudflare 1.1.1.1 and 1.0.0.1
## (NOTE: recommend reducing idle_timeout to 9000 if using Coudflare)
#  - address_data: 1.1.1.1
#    tls_auth_name: "cloudflare-dns.com"
#  - address_data: 1.0.0.1
#    tls_auth_name: "cloudflare-dns.com"
... and uncomment the YAML to become:
## Cloudflare 1.1.1.1 and 1.0.0.1
## (NOTE: recommend reducing idle_timeout to 9000 if using Coudflare)
  - address_data: 1.1.1.1
    tls_auth_name: "cloudflare-dns.com"
  - address_data: 1.0.0.1
    tls_auth_name: "cloudflare-dns.com"
I would also then comment out the servers in the DEFAULT UPSTREAMS section. E.g. this part:
############################ DEFAULT UPSTREAMS  ################################
####### IPv4 addresses ######
### Test servers ###
# The Surfnet/Sinodun servers
  - address_data: 145.100.185.15
    tls_auth_name: "dnsovertls.sinodun.com"
    tls_pubkey_pinset:
      - digest: "sha256"
        value: 62lKu9HsDVbyiPenApnc4sfmSYTHOVfFgL3pyB+cBL4=
  - address_data: 145.100.185.16
    tls_auth_name: "dnsovertls1.sinodun.com"
    tls_pubkey_pinset:
      - digest: "sha256"
        value: cE2ecALeE5B+urJhDrJlVFmf38cJLAvqekONvjvpqUA=
# The getdnsapi.net server
  - address_data: 185.49.141.37
    tls_auth_name: "getdnsapi.net"
    tls_pubkey_pinset:
      - digest: "sha256"
        value: foxZRnIh9gZpWnl+zEiKa0EJ2rdCGroMWm02gaxSc9Q=
####### IPv6 addresses ######
### Test servers ###
# The Surfnet/Sinodun servers
  - address_data: 2001:610:1:40ba:145:100:185:15
    tls_auth_name: "dnsovertls.sinodun.com"
    tls_pubkey_pinset:
      - digest: "sha256"
        value: 62lKu9HsDVbyiPenApnc4sfmSYTHOVfFgL3pyB+cBL4=
  - address_data: 2001:610:1:40ba:145:100:185:16
    tls_auth_name: "dnsovertls1.sinodun.com"
    tls_pubkey_pinset:
      - digest: "sha256"
        value: cE2ecALeE5B+urJhDrJlVFmf38cJLAvqekONvjvpqUA=
# The getdnsapi.net server
  - address_data: 2a04:b900:0:100::38
    tls_auth_name: "getdnsapi.net"
    tls_pubkey_pinset:
      - digest: "sha256"
        value: foxZRnIh9gZpWnl+zEiKa0EJ2rdCGroMWm02gaxSc9Q=
Optional - Reduce the Idle Timeout
Finally, the config comments said that if using Cloudflare, one should reduce the idle_timeout to 9000, so do that too, which can be easily done by executing the following commands:
SEARCH="idle_timeout: .*"
REPLACE="idle_timeout: 9000"
FILEPATH="/etc/stubby/stubby.yml"
sudo sed -i "s;$SEARCH;$REPLACE;g" $FILEPATH
Optional - Enable DNSSEC
Next, it would be good to enable DNS security. This will require DNSSEC validation on all answers, and withhold answers that failed.
You can do this by running the following commands:
SEARCH="# dnssec: .*"
REPLACE="dnssec: GETDNS_EXTENSION_TRUE"
FILEPATH="/etc/stubby/stubby.yml"
sudo sed -i "s;$SEARCH;$REPLACE;g" $FILEPATH
... or manually finding this section:
############################### DNSSEC SETTINGS ################################
# Require DNSSEC validation. This will withhold answers with BOGUS DNSSEC
# status and answers that could not be validated (i.e. with DNSSEC status
# INDETERMINATE). Beware that if no DNSSEC trust-anchor is provided, or if
# stubby is not able to fetch and validate the DNSSEC trust-anchor itself,
# (using Zero configuration DNSSEC) stubby will not return answers at all.
# If DNSSEC validation is required, a trust-anchor is also required.
# dnssec: GETDNS_EXTENSION_TRUE
... and changing it to:
############################### DNSSEC SETTINGS ################################
# Require DNSSEC validation. This will withhold answers with BOGUS DNSSEC
# status and answers that could not be validated (i.e. with DNSSEC status
# INDETERMINATE). Beware that if no DNSSEC trust-anchor is provided, or if
# stubby is not able to fetch and validate the DNSSEC trust-anchor itself,
# (using Zero configuration DNSSEC) stubby will not return answers at all.
# If DNSSEC validation is required, a trust-anchor is also required.
dnssec: GETDNS_EXTENSION_TRUE
Restart Stubby Service
Now restart the stubby service for the changes to take effect:
sudo service stubby restart
Test It's Working
Test that it is working by sending a DNS query to it. E.g.
STUBBY_SERVER_IP=192.168.1.3
dig yahoo.com @$STUBBY_SERVER_IP
If all is working, then you should get some output similar to below:
; <<>> DiG 9.18.30-0ubuntu0.22.04.2-Ubuntu <<>> yahoo.com @192.168.1.3
;; global options: +cmd
;; Got answer:
;; ->>HEADER<<- opcode: QUERY, status: NOERROR, id: 58423
;; flags: qr rd ra; QUERY: 1, ANSWER: 6, AUTHORITY: 0, ADDITIONAL: 1

;; OPT PSEUDOSECTION:
; EDNS: version: 0, flags:; udp: 1232
;; QUESTION SECTION:
;yahoo.com.         IN  A

;; ANSWER SECTION:
yahoo.com.      1167    IN  A   74.6.231.21
yahoo.com.      1167    IN  A   74.6.143.25
yahoo.com.      1167    IN  A   74.6.231.20
yahoo.com.      1167    IN  A   98.137.11.164
yahoo.com.      1167    IN  A   98.137.11.163
yahoo.com.      1167    IN  A   74.6.143.26

;; Query time: 60 msec
;; SERVER: 192.168.1.3#53(192.168.1.3) (UDP)
;; WHEN: Sat Mar 01 12:32:16 GMT 2025
;; MSG SIZE  rcvd: 188
Side Note - Additional Testing
I took the time to use my Proxmox firewall to block off port 53 outbound from the Stubby virtual machine, except to my computer (client).
I then ran a dig query against the stubby server, which still came back with results. This is good as it indicates that Stubby
wasn't just using traditional DNS over port 53 as otherwise that wouldn't have worked.
I then blocked off port 853 TCP from my stubby server before re-running the dig query. This came back with no results, indicating that stubby is indeed actually performing DNS over TLS with port 853.
Debugging
Truncated Responses
After having initially implemented this, I kept hitting DNS issues, with certain domains causing my downstream Dnsmasq server to show "reply is truncated". It turns out that this is because UDP packets are only so large, and DNSSEC responses can often not fit within them. I had initially configured my Dnsmasq server to only be listening on port 53 with UDP, but as soon as I reconfigured it to also listen for TCP, my issues went away. This way the information can be safely sent over the network, utilizing multiple packets. The key thing is there was nothing wrong with stubby, but my downstream Dnsmasq server.
Conclusion
You now have a stubby server configured to perform DNS over TLS for you. Now it's up to you how to configure your devices to use it, such as:
- Configure your already existing DNS server to use it as it's upstream.
- Configure your DHCP server to set it as the default DNS
- Manually configure your devices to set the DNS to the IP address of your Stubby server.
References
First published: 1st March 2025