Deploy Your Own DNS Server With Docker
This is a quick tutorial on how to deploy your own DNS service easily through Docker. Having a DNS server is an extremely good idea if you are a Linux enthusiast or a developer. It's much easier to remember names than IP's and having one location that maps all the IPs to hostnames is extremely useful. Because it is deployed through docker, you can use the Linux OS of your choice.
Steps
If you haven't already, install docker on the host server
Create a hosts file within a directory path of: volumes/config/hosts in your home folder.
Create a file in that folder called hosts and fill it with all the hostnames on your network like below:
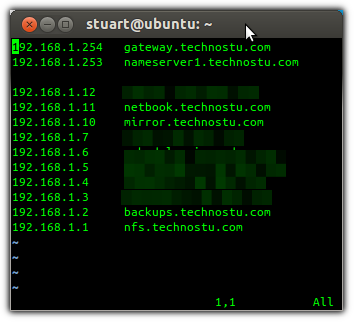
This results in both the host and any other docker containers deployed on the host to utilize the DNS service you just deployed.
However, if you want the host to ignore the DNS service, but keep the docker containers using it, then keep the dns-nameservers
option set to 8.8.8.8 and just update the /etc/default/docker file with the option
DOCKER_OPTS="--dns $MY_SERVER_IP"
Create a docker-compose.yaml file with the following content:
version: "3"

services:
  app:
    container_name: dnsmasq
    image: ${IMAGE_NAME:-dnsmasq}
    restart: always
    ports:
      - "${IP}:53:5353/udp"
      - "${IP}:53:5353/tcp"
    volumes:
      - ./volumes/config/hosts:/dnsmasq.hosts/hosts
    logging:
      driver: "local"
      options:
        max-size: "10m"
        max-file: "5"
        compress: "true"
    environment:
      - LOCAL_DNS_TTL
Create the hosts file which will get mounted in the volume
mkdir -p ./volumes/config
touch ./volumes/config/hosts
At this point, it would be good if you filled that hosts file with your A records in a similar format to:
127.0.0.1       localhost
192.168.0.1     gateway.mydomain.com
Create a .env file with the following content:
COMPOSE_PROJECT_NAME="dnsmasq"


# Specify the IP address that the DNS service should be listening on.
# This should be your servers local/private IP address
# You may be able to fetch it with:
# ip addr | grep inet | cut -d/ -f1 | awk '{ print $2}' | grep 192
IP=192.168.1.1


# Sepcify the name of the image, and version that you wish to use.
IMAGE_NAME="programster/dnsmasq:latest"


# Set the TTL for results served up by this, rather than forwarded DNS requests. The default in dnsmasq is 0
# so setting that here, but you may wish to bump it up to something like 300 for a five minute TTL.
LOCAL_DNS_TTL=300
sroegner/dnsmasq image, but that wasn't being maintained so I have built my own
and configured it automatically update the repository daily.
Now all you need to do is deploy using the Docker Compose tool:
docker compose up
-d parameter to have it run in the background and not see the output.
Thats it! You now have an incredibly basic DNS "server" setup to answer requests.
docker compose restart
Configure Server To Use The DNS You Just Deployed
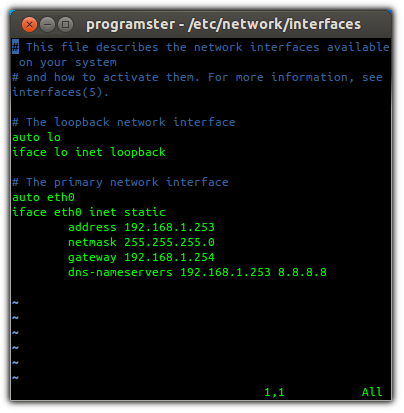
Update the network config file at /etc/network/interfaces (or your netplan config if appropriate) so that dns-nameservers option points
to the hosts own public IP that it wants to answer requests on. It is a good idea to put in a secondary normal DNS as well for when your
new DNS service is not running.
Prevent DHCP Overriding Your Nameserver
If you're doing this on a local home network, chances are that your router is set to provide your computers with dynamic IP's and nameservers. Even if you set a static IP, your server will still grab the nameserver. This will result in your /etc/resolv.conf file having the router's specified nameserver first, which means that your server will not use the DNS system you just set up. Worse yet, this will reset every time the network restarts or you reboot the server.
To prevent this from happening, simply update the DHCP configuration on the server at /etc/dhcp/dhclient.conf, and uncomment/update the following line:
prepend domain-name-servers [YOUR DNS IP HERE];
Alternatively, you could just update your router/dhcp provider's setting for the nameserver so that the correct nameserver automatically "spreads".
References
First published: 16th August 2018